|
|
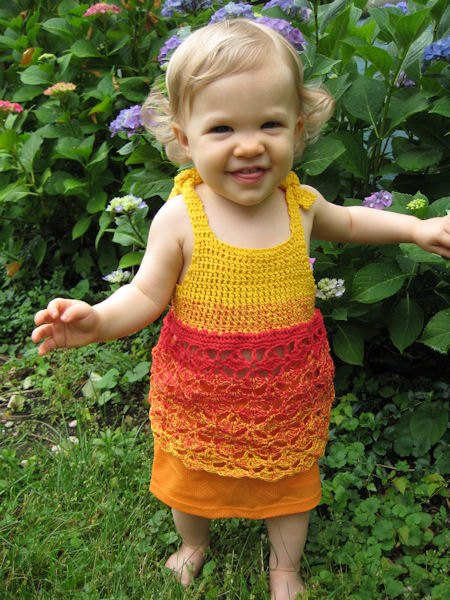
Sizes and Materials List …
|
|
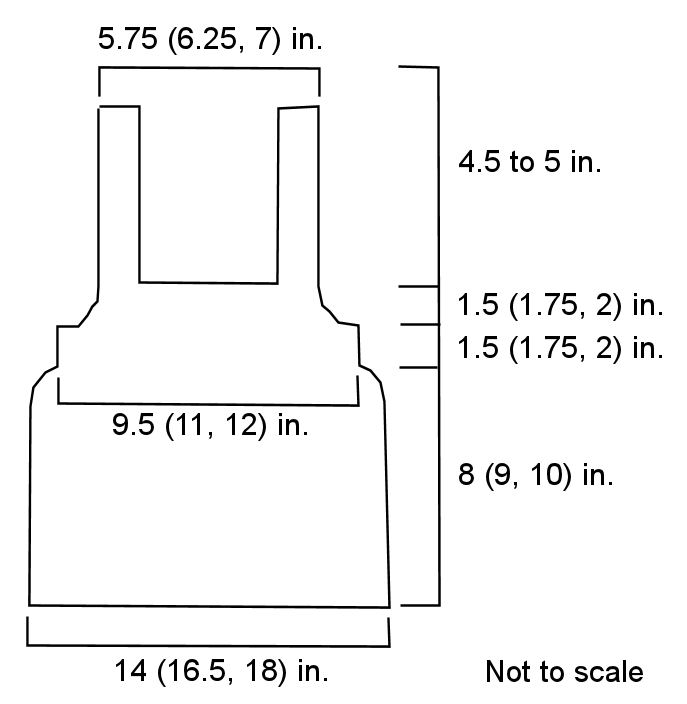
| Size: | 12-18 months (2-3 years, 4-5 years) |
| Hook(s): |
US 7 (4.50 mm) |
| Yarn: | Wolle’s Color Changing Cotton CCC 3 [Cotton, 480 yds, 100 g skein/ball] |
| Colors & Approx. Yardage |
Summer Fruit, 270 (300, 330) yds |
| Notions | Yarn Needle |
| Gauge: | 12 esc and 18.5 rows = 4”/10 cm Always take time to check your gauge |
  |
|
|
Notes …
|
|
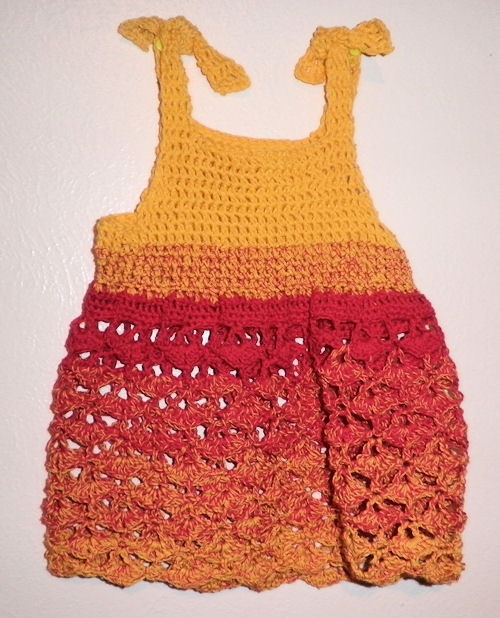
| Construction |
With the esc, the bodice and yoke will be a little drapier but also more see through so a t-shirt or camisole will be needed under the dress. For a more solid fabric, use sc instead of the esc and add one more rep of the decrease rows. |
| Stitches Used | Chain (ch) Slip Stitch (sl st) Single Crochet (sc) Extended Single Crochet (esc) Extended Single Crochet 2 Together (esc2tog) Double Crochet (dc) Foundation Single Crochet (fsc) |
| Abbreviations |
Each (ea) |
| Special Stitches | V-stitch
Dc, ch 2, dc in designated st or sp. Shell 3 dc, ch 1, 3 dc in designated st or sp. Extended Single Crochet 2 Together (Esc2tog) Insert hook into first st, yo, pull through, insert hook into next st, yo, pull through (3 lps on hook), yo, pull through first loop on hook (three loops on hook), yo, pull through all loops on hook. |
|
Instructions …
|
|
| Skirt (worked from waist down) | |
| Base Chain (Waistband) | Fsc 120 (144, 160), join with sl st being careful not to twist the stitches. Weave tail through st on other side of ring and fasten off to close off bottom of circle. Ring should be 28 (33, 36) in. in diameter. |
| Round 1 | Ch 1, sc in same st as joining and in ea st around, joining with sl st in first sc. |
| Rounds 2-3 | Rep round 1. |
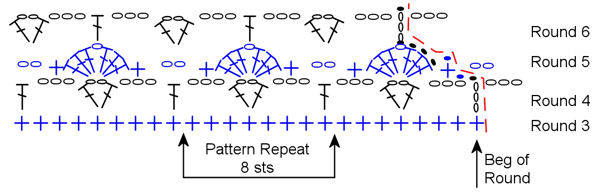
| Round 4 | Ch 6 (beg dc plus 3), sk 3 sts, *v-stitch in next st, ch 3, sk 3 sts, dc in next st, ch 3* rep from * to * around joining with a sl st in third ch of beg dc. |
| Round 5 | Sl st in first ch 3 sp, sc in same sp, *shell in ch 2 sp of next v-stitch, sc in next ch 3 sp, ch 2, sc in next ch 3 sp,* rep from * to * around, ch 2, join with a sl st in first sc. |
| Round 6 | Sl st in top of first 3 dc of shell, sl st in ch 1 sp of shell, ch 6, v-stitch in next ch 2 sp, *ch 3, dc in ch 1 sp of next shell, ch 3, v-stitch in next ch 2 sp,* rep from * to * around, ch 3, join with sl st in third ch of beg dc. |
| Rounds 7-end | Rep rounds 5 and 6 until piece measures approximately 8 (9, 10) in. long, ending with round 5. Fasten off |
| Skirt Chart | |
 |
|
| Bodice | |
| Round 1 | Join with sl st to any fsc at top of waistband, ch 1, sc in same ch as joining, sc2tog, *sc, sc2tog,* rep from * to * around, join with sl st in first sc (Rep from * to * around, join with sl st to first sc, rep from * to * around to last sc, sc, join with sl st to first sc.). |
| Round 2 | Ch 1, sc in same sc as joining, sc in next 3 sc, *sc2tog, sc in next 4 sc,* rep from * to * around to last 2 sc, sc in last two, join with sl st to first sc (Rep from * to * around to last 2 sc, join with sl st to first sc, rep from * to * around to last sc, sc in last sc, join with sl st to first sc). |
| Measure diameter of top of piece and it should measure about 9.5 (10, 11) in. when folded in half. If it is wider, rip back a few inches and sc2tog a couple extra times to decrease the width. If it is too short, rip back a few inches and do a few less sc2tog. | |
| Round 3 | Ch 1, esc in same st as joining, esc in ea st around, join with sl st to first esc. |
| Round 4+ | Rep round 3 until bodice measures 1.5 (1.75, 2) in. in height from waist. |
| Front Yoke | |
| Place a marker in the fourth st on the right of the joining ch on last round of bodice (which is the left edge of the yoke). This is the left side of the dress under the arm.
Fold the dress in half with the marked stitch at the edge and place a marker on the opposite edge to mark the right side. Place another marker on the fourth st to the right of the right side marker. This marks the right edge of the yoke. On back of dress, place markers in fourth st from right and left of side markers. These mark the edge of the back yokes leaving 8 sts between the front and back edges of the yokes for the armhole. |
|
| Row 1 | Ch 1, esc in same ch as joining, esc in ea st across to marker, remove marker and esc in marked st. |
| Row 2 | Ch 1, turn (WS), esc in first st and in ea st across. |
| Row 3 | Ch 1, turn (RS), esc2tog in next two sts, esc in ea st across to last 2 sts on yoke, esc2tog. |
| Rows 4-5 (4-7, 4-7) |
Rep rows 2 and 3 once (twice, twice). Top of yoke should be approx 5.75 (6.25, 7) in. wide. |
| Rows 6+ (8+, 8+) |
Ch 2, turn, esc in first st and in ea st across. Rep until yoke measures 3 (3.5, 4) in. in height from waist, making sure to end with row on WS. Do not fasten off.
Note number of rows made after row 5 to match on back yoke. Model was made with 10 rows from start of armhole for 12-18 months. |
 |
|
| Left Front Strap | |
| Row 1 | Ch 1, turn (RS), esc in first st, esc in next 3 sts. (4 sts) |
| Row 2+ | Rep row 1 until strap measures 4.5-5” depending on how long you want the strap. Fasten off.
Note number of rows made. Model has straps that are 5” long consisting of 19 rows. |
| Right Front Strap | |
| Row 1 | With RS facing, join with sl st in fourth st from edge of yoke on right side of dress, ch 1, esc in same st as joining, esc in next 3 sts. (4 sts) |
| Row 2 | Ch 1, turn, esc in first st, esc in next 3 sts. |
| Row 3+ | Rep row 2 until strap measures 4.5-5” matching number of rows made for left strap. Fasten off. |
| Back Yoke | |
| Row 1 | With RS facing on back of dress, join with sl st in first st to left of marked yoke edge on right side of dress. There should be 8 skipped sts between front yoke edge and beginning of back yoke. Ch 1, esc in same st as joining and in ea st across to marked left edge of back yoke. Do not crochet in marked st to make sure there are 8 sts left between the the left edge of back and front yoke. |
| Row 2+ | Rep front yoke instructions starting with row 2 making sure you end with the same number of rows as made on the front yoke. |
| Back Straps | |
| Rep strap instructions for front yoke, starting with strap on right side of yoke then make strap on opposite side. | |
|
Finishing … |
|
|
Weave in ends. Wash and block as needed. |
|
 |
|
| Pattern and photos © Darlisa Riggs, CatBird Studios | |