|
|
Sizes and Materials List …
|
|
| Size: | Sizes vary depending on pattern chosen. Example is a size small. |
| Hook(s): |
Hook to match selected thread size |
| Yarn: | Any cotton thread – the finer the thread you use, the softer the finished piece will be but will require more motifs |
| Colors & Approx. Yardage |
Any color, yardage varies by motif used, thread size, and garment being made |
| Notions | Yarn Needle Scissors Craft paper Pencil Pattern to trace or old pair of panties Fine elastic cord, Bryson Distributing Rainbow Elastic Thread, 1mm Fine |
| Gauge: | Gauge not important for this project |
 |
|
|
Notes …
|
|
| Pattern |
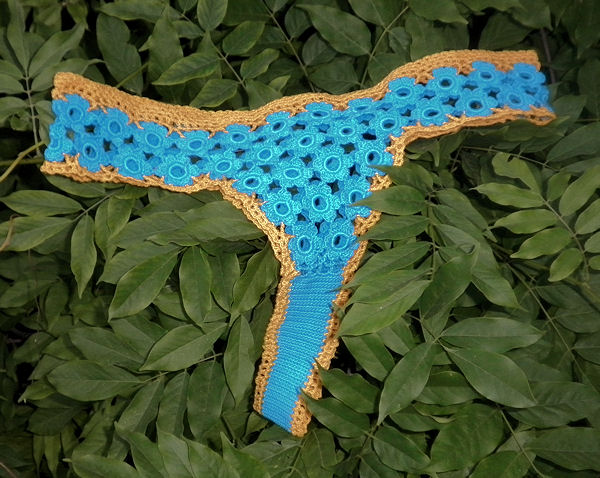
For the pattern, you can find a pattern online or purchase one from your local fabric store (McCalls has two nice patterns: M6128 and M5651). Cut out the pieces for the pattern you want to use and trace it on to craft paper. Measure out the seam allowance and cut on the seam allowance for your pattern. Or, you can take an old pair of panties that you are willing to sacrifice, and cut it at the side seams. Lay the panties out on the craft paper and trace around it. Cut out the pattern. Once you make your first motif, trace around it on some paper, cut it out, then use the tracing as a template to draw the shape on to your pattern to see how many you will need and where they will be placed/joined. |
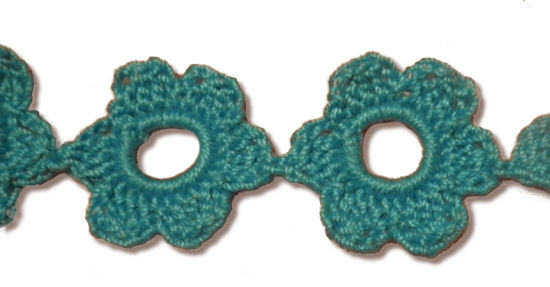
| Base ring | When crocheting the first round into the ring, hold the tail of the thread behind the ring and crochet around it as you go. Because there are 24 scs to be made into the ring, the tail can be pulled to compress the stitches to make more room as needed. The additional benefit is that you don’t have to manually weave the tail into the piece since it will be done already. |
| Petals | Each flower has six petals so when figuring out where to join the motifs, the petal you join first to the previous motif counted as petal 1 (except the first motif where it is joined at petal 4).
When joining, place ea motif back to back with the thread on the right. Insert hk into top of petal being joined and join with a sl st. |
| Weaving Ends | It is suggested that you weave in the tails of each motif every few motifs, otherwise, you’ll have a lot of dangling ends getting in the way and lots of ends to weave in at the end. |
| Variations | For variety, use one color thread for the base ring and a second color for the petals. Crochet over the end tail of the first color in order to work it into the piece without having to weave it in later. Use either color for the fill in stitches or even a third color. |
| Stitches Used | Chain (ch) Slip Stitch (sl st) Single Crochet (sc) Half-Double Crochet (hdc) Double Crochet (dc) Double Crochet Cluster (dc cl) Treble Crochet (trc) |
| Abbreviations |
Each (ea) |
| Special Stitches |
Double Crochet Cluster (dc cl) Ch 3, *(yo, insert hk into next sc, yo, pull up lp, yo, pull through 2 lps) rep from * twice, yo, pull through all 4 lps on hk, ch 3, sl st into next sc. |
|
Instructions …
|
|
| Panty Round 1 (at waist) | |
| Motif 1 | |
| Base Chain | Ch 8, joining with sl st in first ch. |
| Round 1 | Ch 2 (turning ch and first sc), 23 sc into ring, join with sl st in top of beg ch 2. (24 sc).
Note: If using a fine thread and you would like a larger motif in order to make fewer of them, replace the sc in this round with hdc or dc. |
| Round 2 | Make six (6) dc cl around joining with sl st in same sc as beg dc. Fasten off. Clip beg tail only. (6 dc cl) |
| Motif 2 | |
| Base Chain & Round 1 | Rep base ch and round 1 from motif 1. |
| Round 2 | Dc cl, sl st into top of one cluster of prev motif (petal 4), ch 3, sl st into next sc, dc cl around, joining with sl st in same sc as beg dc. Fasten off. Clip beg tail only. (6 dc cl) |
| Motif 3+ | Rep motif 2 until there are enough flowers to go around the waist minus one. |
| Last Motif | Rep motif 2, joining petal 1 to petal 4 of prev motif and petal 4 to petal 1 of the very first motif. |
 |
|
| Panty Round 2 | |
| Motif 1 – placed below and centered between motifs 1 & 2 from round 1 | |
| Base Chain & Round 1 | Rep base ch and round 1 from motif 1 of round 1. |
| Round 2 | Make 6 dc cl around joining as follows:
|
| Motif 2 – placed to right of motif 1 above but below and centered between motifs 2 & 3 from round 1 | |
| Base Chain & Round 1 | Rep base ch and round 1 from motif 1 of round 1. |
| Round 2 | Make 6 dc cl around joining as follows:
|
| Motif 3+ | Rep motif 2 above until there are only one motif is left |
| Last Motif | Rep motif 2 above, joining as follows:
|
 |
|
| Panty Round 3+ – Rep round 2 of panty as needed to get length. | |
| Panty Crotch Front | |
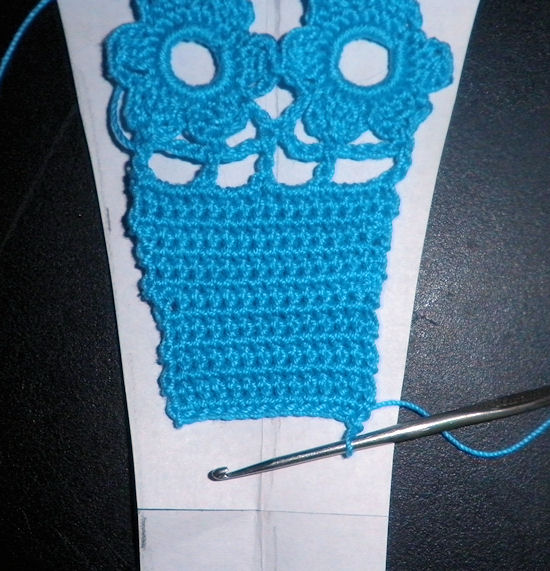
| Row 1 | Using template, determine where first motif of the crotch needs to be and make it following motif 1 of panty round 2. Contine with adding motifs following motif 2 of panty round 2 until first row is completed (3 to 4 motifs should be sufficient). |
| Row 2+ | Continue adding rows as needed following your pattern to the center of the crotch area ending when there are two motifs in the row. |
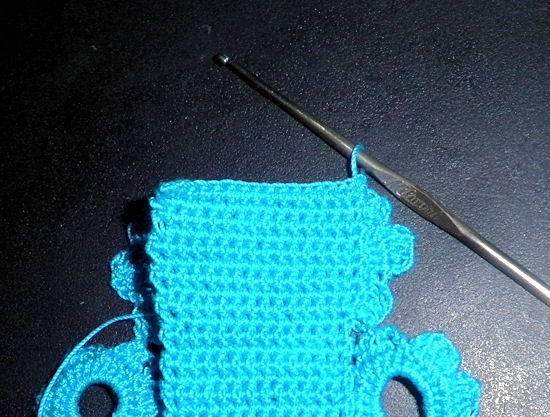
| Panty Crotch Back | |
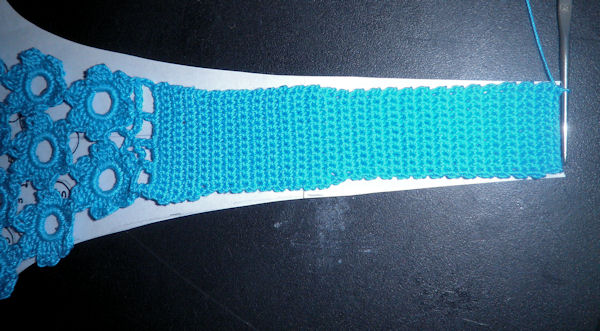
| Locate center back of panty and add motifs to match the front panel or to match the pattern. Note that the piece below shows one motif at the bottom edge but I removed it prior to adding the sc section for the crotch. |
|
 |
|
| Lower Crotch Front | |
| If the front and back crotch area are identical for your pattern, after row 4, keep good notes on how many rows you make and when dec rows are done so you can match the back to the front.
After row 4, if the section is going too slow for you, replace the scs with hdcs. |
|
| Row 1 | Hold panty upside down with front right side facing. Join with a sc to top of petal six of the motif on the right, ch 4, sc in top of petal 5 of same motif, ch 4, dc in between petals 5 and 4 of same motif, dc between petals 1 and 6 of next motif, ch 4, sc in top of petal 6 of next motif, ch 4, sc in top of petal 5 of same motif. |
| Row 2 | Ch 6 (beg dc plus ch-3 sp), turn, dc in first sc, ch 3, dc in top of the two center dcs, ch 3, dc in next sc, ch 3, dc in last sc. |
 |
|
| Row 3 | Ch 1, turn, sc in first dc, *3 sc in first ch-3 sp, sc in next dc,* rep from * to * three times ending with a sc in the top of the beg dc. |
| Row 4 | Ch 1, turn, sc in ea sc across. |
| Next rows | Using your pattern as a guide, rep row 4 until you need to decrease. |
 |
|
| Decrease row | Ch 1, turn, insert hk into first sc, yo, pull through, insert hk into next sc, yo, pull through, yo, pull through all three lps on hk, sc in ea sc across to last two sc, insert hk into next sc,yo, pull through, insert hk into next sc, yo, pull through, yo, pull through all three lps on hk. |
| Next rows | Rep row 4 and decrease row as needed until you reach the center of the crotch area. If making back section using option 1 below, fasten off, otherwise, continue as shown in option 2. |
 |
|
| Lower Crotch Back | |
| Option 1 | Rep instructions for Lower Crotch Front but in the back. When you get to the center of the crotch, join with sc to front section. Fasten off. |
 |
|
| Option 2 |
Continue with sc rows and increasing as needed instead of decreasing until you are ready to join the section to the back of the panty. Place edges of back section of crotch and back of panty together, with working thread on right side and crotch sc section in front, sc first sc of crotch and top of first petal of panty together, ch 3, sc top of second petal to crotch, ch 3, sc in between petals 2 and 3 of same motif, ch 3, sc in center of crotch section, ch 3, sc in between petals 1 and 2 of second motif, ch 3, sc top of petal 2 to crotch, ch 3, sc top of last petal to crotch. Fasten off. |
| Increase Row | Ch 1, turn, 2 sc in first sc, sc across to last sc, 2 sc in last sc. |
 |
|
| Note: Before beginning the last round of the leg or waist trim, decide whether to carry the elastic along with the last round as you go or will be adding it later by weaving it into the sts. See additional notes at end of pattern. | |
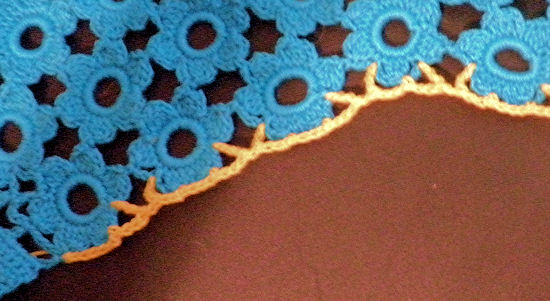
| Leg Trim | |
| Round 1 – Motifs | Join trim thread at top of petal that attaches to the lower crotch section (this will be petal 1 with petal 2 to the left), ch 5, sc in top of next petal (petal 2), *ch 3, trc in between petals 2 and 3, ch 1, trc in between petals 6 and 1 of next motif, ch 3, sc in top of petal 1 of same motif, ch 3, sc in top of petal 2,* rep from * to * around until you get to the crotch area (scs), adjusting as needed. Do not fasten off.
For example, when going around curves, there may be only one free petal at the top. In this case, after the second trc between two motifs, ch 3, sc in top of petal 1, ch 3, trc in between petals 2 and 3, ch 1, trc in between petals 6 and 1 of next motif, etc. If there are more than two free petals, rep the ch 3, sc in top of petal until you can make the joining trcs. |
 |
|
| Round 1 – Crotch | Ch 2, sc in side of dc, ch 2, sc in side of first row of sc, ch 2, sk next sc row, sc in end of next row,* rep from * to * to end of crotch area, ch 2, join with sl st in second ch of beg ch-5. |
| Round 2 – Motifs | If carrying elastic along with last round, add it here. You can crochet it right along with the thread or carry it along the top of the previous round and crochet around it.
Ch 5 (beg hdc plus 2 ch), hdc in first ch-3 sp, ch 2, hdc in next sc, *ch 2, hdc in next ch-3 sp, ch 2, hdc in next ch-1 sp, ch 2, hdc in next ch-3 sp, ch 2, hdc in next sc, ch 2, hdc in next ch-3 sp, ch 2, hdc in next sc,* rep from * to * around to crotch area. Do not fasten off. |
| Round 2 – Crotch | Ch 2, hdc in ch-2 sp between upper and lower section of the crotch, *ch 2, hdc in next ch-2 sp,* rep from * to * to end of sc section, ch 2, sl in top of beg hdc. Fasten off. |
| Waist/Hip Trim | |
| Round 1 | Start at back or side of waist. There should be two petals of ea motif at the waist. The petal on the right is petal 1.
Join trim thread at top of petal 1, ch 3, sc in top of petal 2, rep from * to * of Round 1 – Motifs of Leg Trim, ending with a ch 3 and joining with a sl st in first sc. |
| Round 2, Option 1 |
Rep Round 2 – Motifs of Leg Trim. This option will be a slightly looser waist than option 2. |
| Round 2, Option 2 |
Ch 5 (beg hdc plus 2 ch), hdc in first ch-3 sp, ch 2, hdc in next sc, *ch 2, hdc in next ch-3 sp, ch 2, hdc in next ch-3 sp, ch 2, hdc in next sc, ch 2, hdc in next ch-3 sp, ch 2, hdc in next sc,* rep from * to * around ending with a ch 2 and joining with a sl st to top of beg hdc. |
| Round 3 | If carrying elastic along with last round (and if this is your last round), add it here. You can crochet it right along with the thread or carry it along the top of the previous round and crochet around it.
Sl st in first ch-2 sp, sc in same sp, *ch 2, sc in next ch-2 sp,* rep from * to * around ending with a ch 2 and joining with a sl st in first sc. |
| Round 4+ (optional) | Unless you are making a wider waist, fasten off here, otherwise, rep round 3 above until the waist band is as wide as you’d like. Fasten off. |
|
Finishing … |
|
|
Weave in ends. Wash and block as needed, especially if using natural threads. |
|
| Following instructions from pattern (or measure waist and leg openings of the panties you used as a guide), cut the elastic thread to match plus 3″. Using a yarn needle, weave the elastic into the outside round of each leg and the waist, tying a knot at the end and weaving in the ends. | |
| Final Notes | |
| When making different garments using motifs, the edging you make will vary depending on the type of motif you used. Try different combinations of sts until you get a good fit between the motifs.
Here is some advice I received from Doris Chan when I asked her for advice on the leg and waist trim. I had already taken into consideration the need for the openings to be a little larger in order for elastic to be added and allow for the piece to be pulled over the hips and thighs. My problem was making sure that the joining sts between motifs would work as I’d started them. (Thank you Doris!) For items such as tops or skirt edges, you won’t need to worry about elasticity but you will need to deal with joining the motifs on the edges. Chains have no elasticity. You need to introduce elasticity into your edging or it will never work as a garment on a body.
Please note that the elastic listed in the notions section was what Doris recommended to me. |
|
| Pattern and photos © Darlisa P. Riggs, CatBird Studios | |