|
|
Sizes and Materials List …
|
|
| Size: | Varies depending on yarn selected |
| Hook(s): |
Hook to match selected yarn. Sample uses US 7 (4.50 mm) |
| Yarn: | Any yarn from thread to worsted
Sample uses Hobby Lobby I Love This Yarn [100% Acrylic, 230 yds/70 g skein/ball] |
| Colors & Approx. Yardage |
Using Sport Weight:
In place of plain white yarn, you can substitute some white fun fur instead |
| Notions | Yarn Needle |
| Gauge: | Gauge is not important for this project |
 |
|
|
Notes …
|
|
| Tails | Try to work all tails (except for the ones to be used for seaming) in as you go by crocheting over them. This will mean fewer tails to weave in later. |
| Stitches Used | Chain (ch) Slip Stitch (sl st) Single Crochet (sc) |
| Abbreviations |
Beginning (beg) |
|
Instructions …
|
|
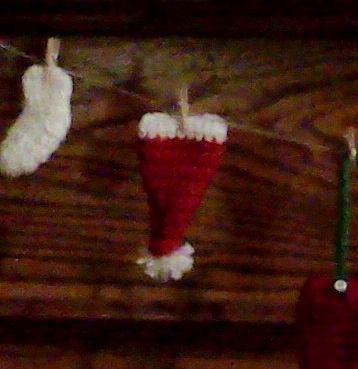
| Hat | |
| Row 1 | Leaving a long tail for seaming, with red ch 2, two sc in second ch from hk. (2 sts) |
| Row 2 | Ch 1, turn, 2 sc in both sc. (4 sts) |
| Row 3 | Ch 1, turn 2 sc in first sc, sc in next 2 sc, 2 sc in last sc. (6 sts) |
| Row 4 | Ch 1, turn, sc in ea sc across. |
| Row 5 | Ch 1, turn, 2 sc in first sc, sc in ea sc across to last sc, 2 sc in last sc. (8 sts) |
| Rows 6-9 | Rep rows 4 and 5, twice. (12 sts at end of row 9) |
| Rows 10-11 | Ch 1, turn, 2 sc in first sc, sc in ea sc across to last sc, 2 sc in last sc. (16 sts at end of row 11) |
| Rows 12-13 | Rep rows 4 and 5. (18 sts) |
| Rows 14-16 | Rep row 4. Fasten off. |
| Row 17 | Hold red piece so end just fastened off is on your right. Mark this side as the RS. Join white with sl st in first sc, ch 1, sc in same sc, sc in ea sc across. Work in both the red and white ends into piece as you go. |
| Row 18 | Ch 1, turn, sc in ea sc across, fasten off leaving a long tail for seaming. |
| Finishing | |
| Fold hat in half, RS together, matching up white edges and red rows as much as possible. Sew up seam using the long tail from the top of the hat for the red section. Use the white tails to connect the white trim. | |
| Weave in all ends and turn hat RS out. | |
| Add a small white pom pom at the tip of the hat. This can be a purchased one or a quick one made with your white yarn. | |
| Pom Pom | |
| Cut a piece of white yarn about 10″ long. Place the yarn between your index and middle finger, letting the ends dangle down. If you don’t place the yarn this way before you continue, it will be a lot harder to get the yarn around the pom pom section that will be wrapped around your first two fingers. | |
| Wrap white yarn around the index and middle finger about 10 times. Don’t cut the yarn yet. | |
| Take the ends of the yarn you placed between your fingers and wrap them around the yarn that is around your fingers. Tie in a knot to hold the wrapped yarn together. Cut the yarn going to the skein but leave the long ends that you just tied. | |
| Carefully cut the wrapped yarn loops then trim the ends to even out your pom pom. | |
| Using your yarn needle, thread the long tails into the top of the hat making sure each tail is inserted into a different st. | |
| Turn the hat inside out, using the long tails to help do so. Tie the tails into a knot and trim the ends. Turn the hat RS out. | |
| Pattern and photos © Darlisa Riggs, CatBird Studios | |