|
|
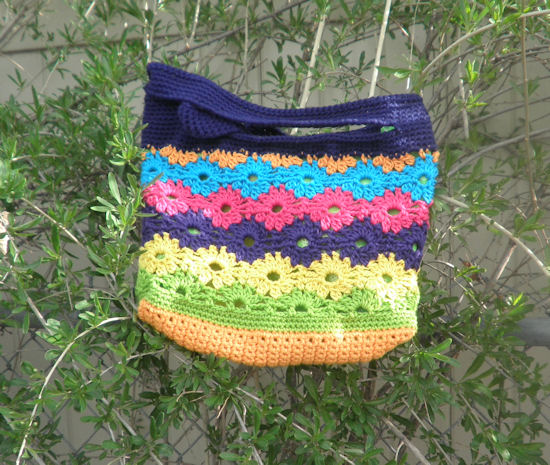
Sizes and Materials List …
|
|
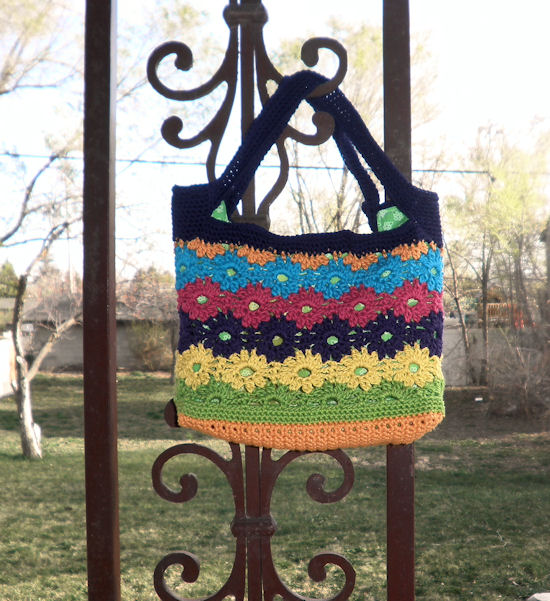
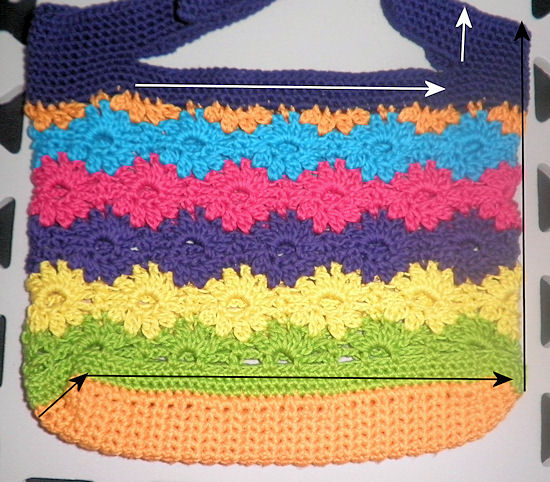
| Size: | Sample measures 11″w x 9.5″h x 2.75″d |
| Hook(s): |
US H/8 (5.0 mm) |
| Yarn: | Any DK / 8 ply yarn
Sample uses Wildflower D.K. by Plymouth Yarn Company [51% cotton, 49% acrylic, 136 yds/50g skein] (Discontinued) |
| Colors & Approx. Yardage |
A – Orange, 55 yds |
| Notions | Yarn Needle 1/2 yard contrasting fabric for lining Sewing Machine Scissors Straight Pins Ruler/Straight Edge Fabric Marker |
| Gauge: | Gauge is not really important for this project |
 |
|
|
Notes …
|
|
| Working | The notes for making modifications are fairly long so you can find them at the bottom of the instructions. When you see a number in brackets, refer to the working notes for suggestions on modifying or adding to the purse. Modifications include making the purse wider or smaller and taking up some of the purse width without starting over if you decide it’s too wide. Instructions for making the lining are under the working notes. |
| Stitches Used | Chain (ch) Slip Stitch (sl st) Single Crochet (sc) Double Crochet (dc) Double Crochet 2 Together (dc2tog) |
| Abbreviations |
Each (ea) |
| Special Stitches |
Double Crochet 2 Together (dc2tog) Yo, insert hk into st, yo, pull through, yo pull through two lps on hk, yo, insert hk into same st, yo, pull through, yo, pull through two lps on hk, yo, pull through all lps on hk. |
|
Instructions …
|
|
| Base | |
| Row 1 | With A, ch 13, sc in second ch from hk and in ea ch across. |
| Row 2 | Ch 1, turn, sc in ea sc across. |
| Rows 3-48 | Rep row 2, do not turn after row 48. [1] |
| Sides (do not turn at end of ea round) | |
| Round 1 | Sc in end of ea row down long edge, in ea sc across short end, back up the long edge, and across second short edge. Join with sl st in first sc and fasten off. (You should have 122 sc around but as long as you have at least 121 or a multiple of 11, you’ll be fine.) |
| Round 2 | With B, join with sc in any sc of round 1 (pm) and sc in each sc around. You will be working in rounds so do not join with a sl st in first st. |
| Rounds 3-4 | Sc in ea sc around moving the marker up on ea round. |
| Round 5 | Sl st in marked st (leave marker in sc), ch 3, sk 3 sc, sc in next sc, *ch 2, sk 2 sc, sc in next sc, [ch 3, sk 3 sc, sc in next sc] twice,* rep from * to * around, to last 2 (or possibly 3) sc, ch 2, sc in marked sc. Continue moving marker up as you go or just remember to end ea round with a sc in the same sc as the beg sl st. |
| Round 6 | (Top half of flower) *Ch 1, [dc2tog, ch 2] three times in ch-2 sp, dc2tog in same ch-2 sp, ch 1, sc in next sc,* rep from * to * around ending with sc in marked st. Fasten off. |
| Round 7 | (Bottom half of flower) With C, join with sl st in the top center ch-2 sp of any flower half, *ch 3, dc2tog in top of next four dc2tog, ch 3, sc in next sc,* rep from * to * around ending with sc in marked st. [2] |
| Round 8 | *Ch 3, sc in top of first dc2tog, ch 2, sk next two dc2tog, sc in top of next dc2tog, ch 3, sc in next sc,* rep from * to * around ending with sc in marked st. |
| Round 9 | Rep round 6. Fasten off. |
| Rounds 10-18 | Rep rounds 7 through 9 with D, E, and F. Add additional rounds as needed for a deeper/larger purse. |
| Round 19 |
Rep round 7 with A. If wanted, rep round 8 with A before continuing with the first round of the handle. This may help with any “ruffling” that may occur, if any. |
|
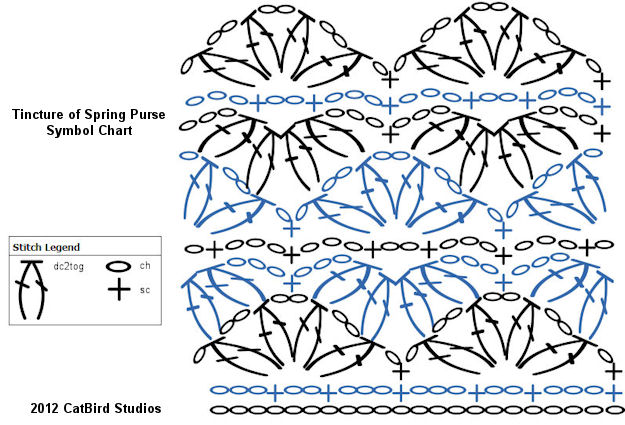
The chart below gives you an idea of how the stitches go together. A beginning and end aren’t noted since it is worked in the round. Chart starts with round 5. Chart made using the Crochet Charts software made by Stitch Works Software. |
|
|
Handles |
|
| Find the center of the motifs at the short ends of the purse and place markers. You should be in between the two center dc2togs of the half motif made on round 19. | |
  |
|
| Round 1 |
Join G with sc in top of dc2tog to the left of one of the markers, sc in next dc2tog, *3 sc in ch-3 sp, sc in next sc, 3 sc in next ch-3 sp, sc in next 4 dc2tog,* rep from * to * around ending with a sc in ea of the last two dc2tog. Do not join as you’ll be working in rounds. If you added a final round 8 on the sides, place 3 sc in ea ch-3 sp and 2 sc in ea ch-2 sp, skipping the sc in ea sc in place of the instructions above. |
| Round 2 | Sc in ea sc around. |
| Rounds 3-4 | Rep round 2. |
| Round 5 | Place a second marker 10 sts to the right of each side center marker. This will mark where to join the handle ch.
Sc in next 9 sc, ch 45, sc in st to left of next marker, sc in next 18 sc, ch 45, sc in st to left of first marker on other side of purse, sc in next 9 sc. Remove all markers except for the one that marks where you joined the yarn at. [3] |
| Round 6 | Sc in next 9 sc, 60 sc in ch-45 sp, sc in next 18 sc, 60 sc in ch-45 sp, sc in next 9 sc. [4, 5]
|
| Rounds 7-11 | Sc in ea sc around. [6, 7]
After round 11 if not continuing to round 12, join with sl st in marked st. Fasten off. |
| Round 12 | (Optional) Ch 1, turn, sc in ea sc around. Join with sl st in first sc of this round and fasten off. [8, 9] |
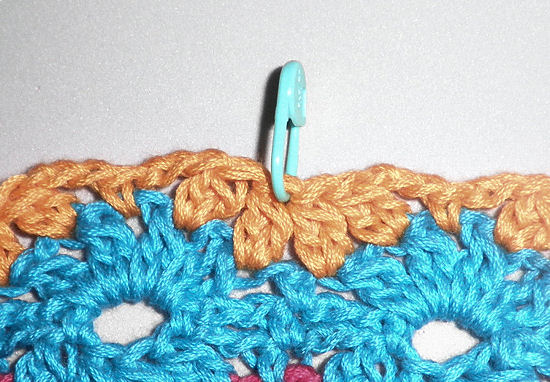
| Round 13 | (Optional) With any contrasting color, sc around the tops of the handles and around both handle openings. [10] |
|
Finishing … |
|
|
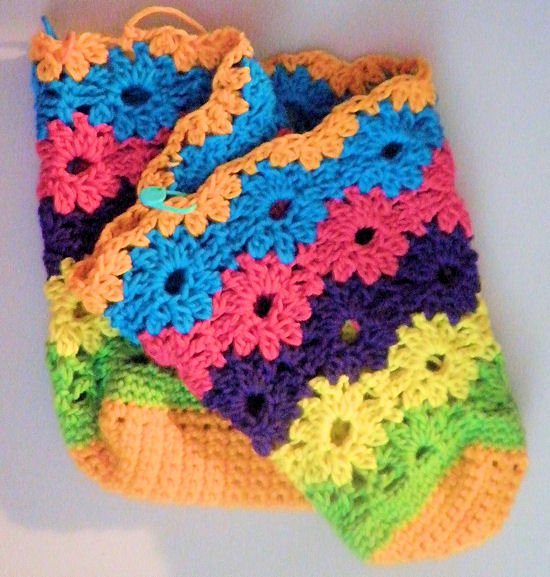
Weave in ends. Wash and block as needed. Make and add a lining (see instructions under working notes). (Optional) Add a fastener of some sort to close the bag. |
|
| Working Notes | |
| Refer to these notes when you see the number in brackets in the instructions. 1. Increase or decrease the base rows by 5 rows to change the size. 2. If using a single color, you’ll need to use sl sts to work your way to where this round begins, or (recommended), go ahead and fasten off the yarn after round 6, join for round 7, fasten off after round 9, etc. 3. For a longer handle, add additional chs to the ch-45 or, for a shorter handle, remove chs from the ch-45. You can also increase the number of sts on the sides so, instead of 18 sts on the sides, make 20, 22, or 24, etc. Just make sure you add sts evenly on ea side. 4. When making the 60 sc over the ch-45 sp, don’t crochet too tightly and use your fingers to adjust the sc to distribute them over the ch. 5. If you increased the handle ch, add 6 to 7 sc over the ch for every 5 ch you added to the handle. If you decreased the handle ch, make 6 to 7 sc less over the ch for every 5 ch you decreased the handle. 6. For a thicker handle, continue crocheting around until it is as thick as you want it to be. You can also replace the sc on rounds 7-11 with extended single crochet so it goes faster. 7. If your handle is very long, like for an over the shoulder type strap, you might want a thinner strap, perhaps only making rounds 7-9. 8. While this round is optional, it will help even out and strengthen the top edge of the handle. 9. When completing this round, you could use sc2tog on the short sides to create a “gathered” section. This adds interest but can also take up some length if you decide that the bag is too long. 10. If needed, this round can be used to decrease the length of the top of the purse under the handles by using sc2tog a few times across the base of the handle opening. |
|
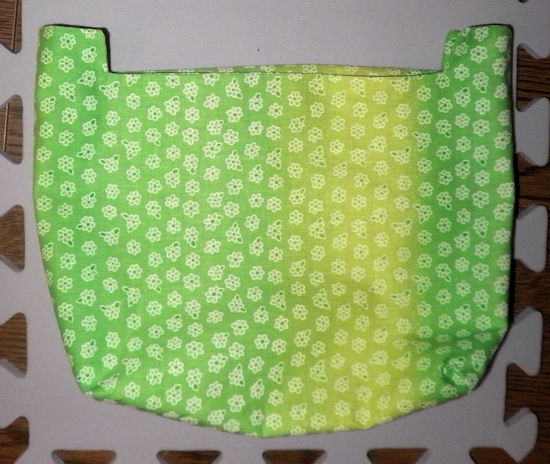
| Lining | |
1. Measure the following on the purse:
Note: If you “gathered” any section at the top of the purse, make the measurements below the gathers to get the original purse size. You can manually gather the top of the lining when sewing it in to get it to fit. |
|
 |
|
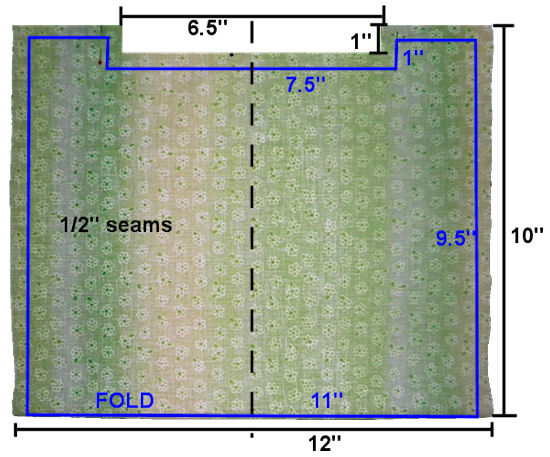
| 2. Seam allowances are 1″ so add 1″ to the purse width and 1/2″ to the purse height. If the base part is not on the fold and will be sewn together, add 1″ to the purse height to account for the additional seam. Now double the length to account for both sides of the bag. Cut out two pieces of fabric to match your measurements. For the sample, I cut out two 12″x20″ pieces of fabric and folded each in half (see image below). The blue lines and measurements are for the actual purse with the measurements in black showing the addition of the seam allowances. | |
| 3. Next, you’ll need to cut out the opening for the handle opening. Since my opening was 7.5″, I subtracted 1″ for seam allowances then measured 3.25″ from the center on both sides to get my 6.5″ measurement. I then measured down from the top 1″ and cut out the opening section. Make sure you cut the opening for all four layers of fabric. | |
 |
|
| 4. Sew up the sides of both pieces using a 1/2″ seam allowance and zigzag over them. | |
| 5. Press the seam allowances to one side making sure they all go in the same direction, i.e., press all seams to the left. This will help with lining up the seams and reducing bulk. Lightly press the bottom fold so you have a guideline for the next step. | |
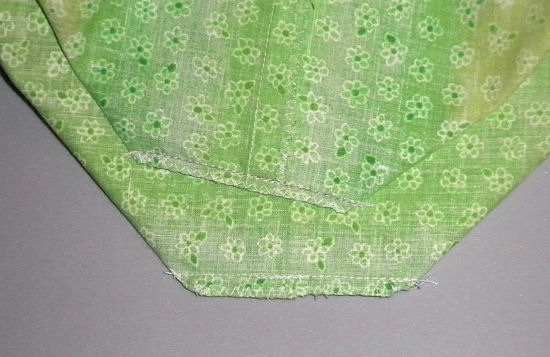
| 6. Open one of the bags and lay the side seam along the pressed edge of the base to form a triangle. | |
 |
|
| 7. Pin together on the seam then measure up 1.5″ from the point and mark across the corner. Repeat for other side and second bag. | |
 |
|
| 8. Sew on the marked line making sure to backstitch at the beginning, over the seam, and at the end. Trim the seam and zigzag over it. Repeat for other side and second bag. Press the seam to the underside of the bag (along base). | |
 |
|
| 9. Turn one of the bags right side out and place inside the other bag, lining up the seams and making sure the seam allowances go in opposite directions. If you ironed them right in the step above, they should do this. | |
 |
|
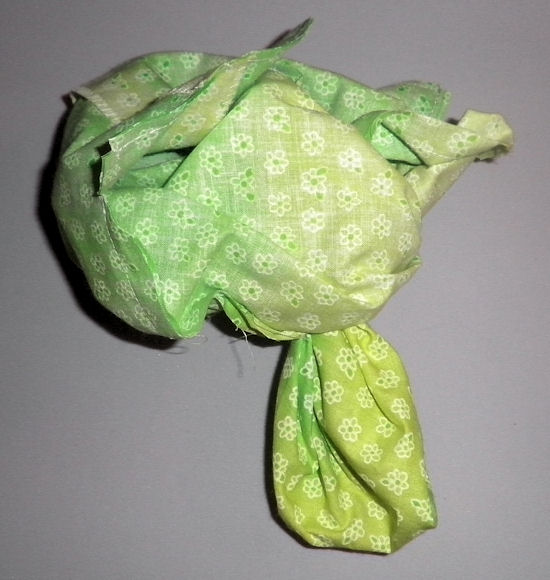
| 10. Sew the top of the bags together leaving a 1.5″ opening along one edge of the handle opening section (see arrow below). Clip corners and any seams you’d like to. | |
 |
|
| 11. Reach inside the opening and grab the outside bag and pull it up through the opening. You’ll have to work at this a bit as the opening is small but keep tugging and pushing and it will eventually come out. | |
 |
|
| 12. Push the bag you just pulled out into the other bag. Both right sides should now be showing. Iron the bags especially at the top to neaten up the seam. | |
 |
|
| 13. Insert the bag into your purse and pin on the inside along the edges. You may need to adjust the crocheted edging to fit, especially if it has stretched a bit. | |
 |
|
| 14. Sew the bag into the purse, either by hand or by machine. Adjust the lining inside the bag. Congratulations! You’ve completed an awesome crocheted purse with a double lining! | |
 |
|
| Pattern and photos © Darlisa P. Riggs, CatBird Studios | |