|

|
Sizes and Materials List …
|
|
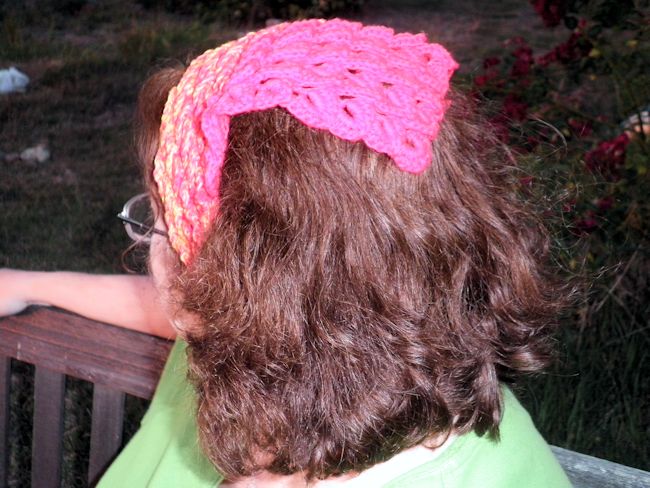
| Size: | Sample is 19″w x 8″ l w/o ties, which are ea 12″ l |
| Hook(s): |
US I/9 (5.50 mm) |
| Yarn: | Wolle’s Yarn Creations Color Changing Cotton CCC 3 [Cotton, 480 yds, 100 g skein/ball] |
| Colors & Approx. Yardage |
Summer Fruit, 160 yds |
| Notions | Yarn Needle Stitch Marker |
| Gauge: | Gauge is not important for this project |
 |
|
|
Notes …
|
|
| FYI |
|
| Stitches Used | Chain (ch) Slip Stitch (sl st) Single Crochet (sc) Double Crochet (dc) Front Post Double Crochet (fpdc) |
| Abbreviations |
Each (ea) |
|
Instructions …
|
|
| Main Kerchief | |
| Row 1 | Ch 5, join with sl st to form a circle. |
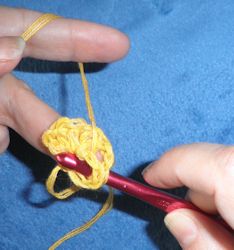
| Row 2 | Ch 1, 5 fpdc into ring, ch 1, turn piece so the first 5 fpdc are on top, 5 fpdc into other side of ring. (1 cs) |
 |
|
| Row 3 (Increase row) |
Ch 1, insert hk into the two front lps of the last dc made and make a sl st, ch 3, dc in same st, ch 2, dc in center of first crocodile st, ch 2, 2 dc in end of last dc of first crocodile st. |
 |
|
| Row 4 | Ch 1, turn the piece so the dc just made is at the top, 5 fpdc into side of first dc of row 3, ch 1, flip piece towards you so tip of first crocodile st is pointing to the right and front of piece is facing you, 5 fpdc into second dc of row 3, sc in next dc, 5 fpdc around next dc, ch 1, turn piece so front is facing you, 5 fpdc around last dc. |
 |
|
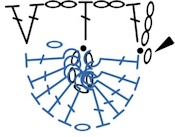
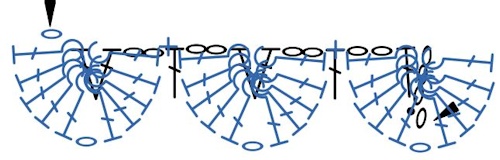
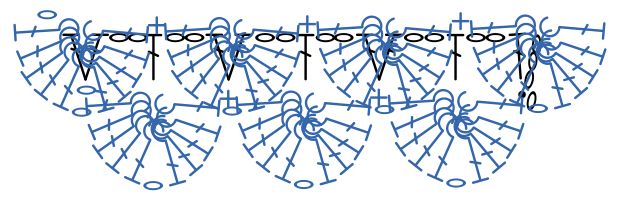
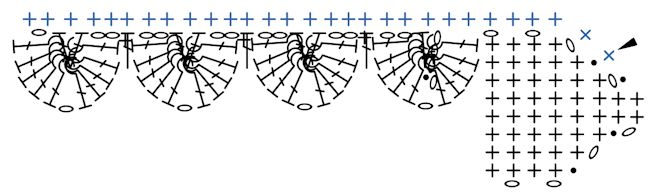
Chart so far … |
|
| Row 5 (Increase row) |
Ch 1, insert hk into the two front lps of the last dc made and make a sl st, ch 3, dc in same st, ch 2, dc in center of first crocodile st, ch 2, 2 dc in first sc, ch 2, dc in center of second crocodile st, ch 2, 2 dc in end of last dc of row 4. |
 |
|
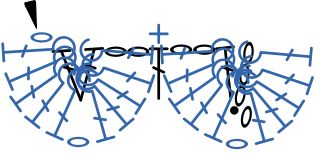
Chart so far …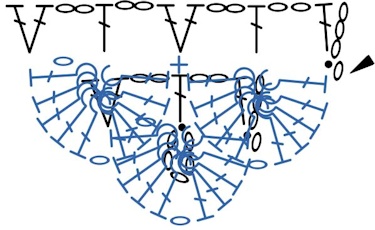 |
|
| Row 6 | Ch 1, turn the piece so the dc just made is at the top, 5 fpdc into side of first dc of row 5, ch 1, flip piece towards you so tip of first crocodile st is pointing to the right and front of piece is facing you, 5 fpdc into second dc of row 5, *sc in next dc, 5 fpdc around next dc, ch 1, turn piece so front is facing you, 5 fpdc around next dc,* sc in next dc, rep from * to * to last dc. |
 |
|
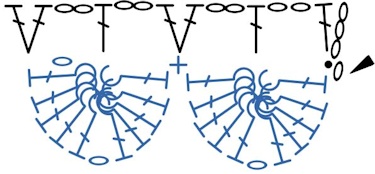
Chart so far …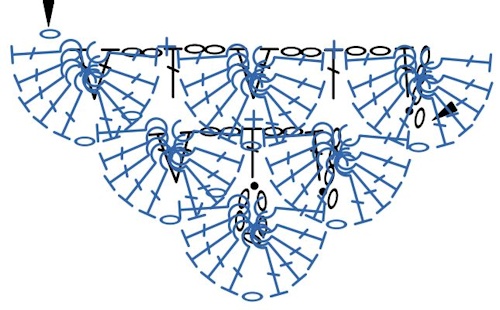 |
|
| Row 7 (Increase row) |
Ch 1, insert hk into the two front lps of the last dc made and make a sl st, ch 3, dc in same st, ch 2, dc in center of first crocodile st, ch 2, 2 dc in first sc, *ch 2, dc in center of next crocodile st, ch 2, 2 dc in next sc,* rep from * to * ending with 2 dc in end of last dc of previous row. |
| Row 8 | Rep row 6. |
| Rows 9-28 | Continue repeating rows 7 then 6 until top edge (row you are working on) is 18″ long, making sure row 6 is made last. For the sample kerchief, this was at row 28 and allowed the kerchief to cover the ears if needed.
For smaller kerchiefs, measure from the bottom of the ear, over the top of the head and back down to the bottom of the ear. When the top edge reaches this length, continue to row 29 instructions. For a shawl, just keep going until the piece is as large as needed then either add four more rows and ties as shown below starting with row 29 or add two sc rows at the top as shown below under Shawl Top Edge – No Ties. |
 |
|
| The following row will not be increasing the size of the piece. Instead it will allow the piece to have a “straight” edge to use for the ties. | |
| Row 29 (Decrease row) |
Ch 1, turn, sl st twice into the side of the top dc of the first crocodile stitch, sl st into center of first crocodile stitch, ch 5 (dc + ch-2 sp), dc in first sc, *ch 2, dc in center of next crocodile st, ch 2, 2 dc in next sc,* rep from * to * ending with dc in center of last crocodile stitch. |
 |
|
| Row 30 | Ch 1, sk first dc, rep row 6, skipping the last dc. |
 |
|
| Row 31 (Increase row) |
Rep row 7. |
 |
|
| Row 32 | Rep row 6. |
 |
|
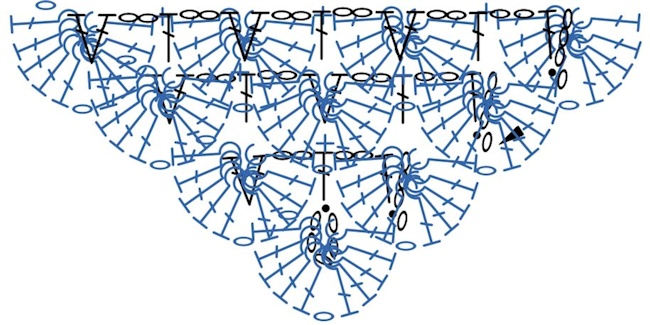
Full chart so far … |
|
|
Kerchief Tie, Left |
|
| Row 1 | Turn piece so left edge is facing up, keeping the front of the piece facing you. You’ll be adding scs into the end of the dcs of the two crocodile stitches on the end of the piece.
Ch 1, sc into end of the first four dc of first crocodile stitch (row 32) and next four dc of second crocodile stitch (row 28), making sure to skip the crocodile stitch of row 30. (8 sc) |
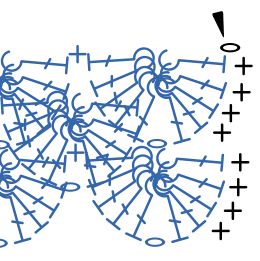 Note that in next chart, the row 1 sts for the tie will be shown “flat” to make it easier to view the chart. |
|
| Rows 2-4 | Ch 1, turn, sc in ea sc across. |
| Row 5 | Ch 1, turn, sk first sc, sc in next six sc, sl st in last sc. (6 sc) |
| Rows 6-7 | Rep row 5. (4 sc at end of row 6, 2 sc at end of row 7)
Please note that after row 7, the front should be facing you with the last stitch on the same side as the slanted edge of the piece. |
| Row 8 | Ch 1, turn, sc into first sc, ch 41. |
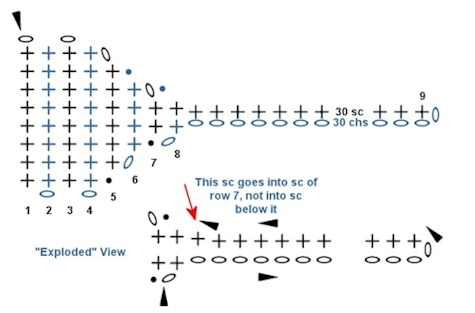
| Row 9 | Sc into back loop of second st from hk, sc into next 39 chs, sc into second sc of row 7, sl st into ch-1 sp. Do not turn, fasten off, or cut yarn. |
 |
|
 |
|
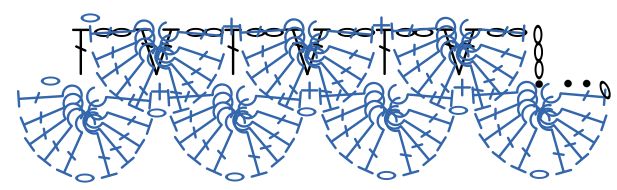
| Top Edge Row 1 | |
| Note: Except for the first and last two scs of this row, you’ll be working into the mesh row instead of into the dcs of the crocodile stitches. This keeps the crocodile stitches “free” and it’s easier to work into the mesh than into the dcs of the crocodile stitches. | |
| Sc into sides of each row for rows 7 down through 1 of the tie, pm, 2 sc into edge of top dc of first crocodile stitch, *2 sc into ch-2 sp, sc in center of crocodile stitch, 2 sc in ch-2 sp, sc in dc,* rep from * to * across, 2 sc into side of top dc of last crocodile stitch. | |
 |
|
| Kerchief Tie, Right | |
| Turn piece so right edge is facing up and back of piece is facing you. Rep rows 1-8 above. | |
| Top Edge Row 2 | |
| Sc into each sc across to marked st, sl st in marked st, fasten off. | |
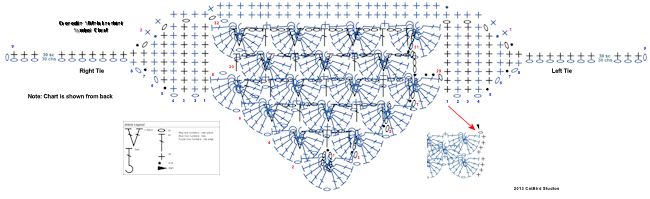 Download PDF version of chart. Print on 11″x17″ paper. Chart made using the Crochet Charts software made by Stitch Works Software. |
|
| Shawl Top Edge – No Ties | |
| Note: Except for the first and last two scs of this row, you’ll be working into the mesh row instead of into the dcs of the crocodile stitches. This keeps the crocodile stitches “free” and it’s easier to work into the mesh than into the dcs of the crocodile stitches. See the section for the top edge for the kerchief for the chart. | |
| Row 1 | Ch 1, turn, 2 sc into side of top dc of last crocodile stitch, sc in center of first crocodile stitch, *2 sc in ch-2 mesh, sc in dc, 2 sc in ch-2 mesh, sc in center of next crocodile stitch,* rep from * to * to last crocodile stitch, 2 sc into side of top dc of last crocodile stitch, sc in end of same dc. |
| Row 2 | Ch 1, turn, sc in ea sc across. Fasten off. |
|
Finishing … |
|
|
Weave in ends. Wash and block as needed. |
|
 |
|
| Instructions With Images | |
| The following section shows each row with step by step instructions illustrated with images. Hopefully this will help those trying the crocodile stitch for the first time. | |
| Row 1 | Ch 5, join with sl st to form a circle. |
 |
|
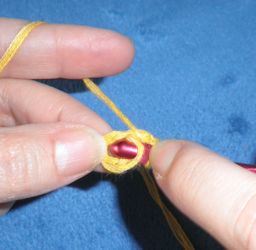
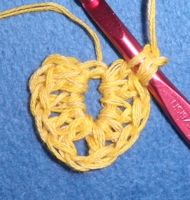
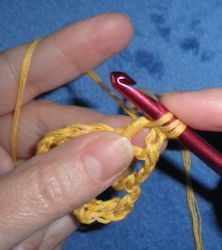
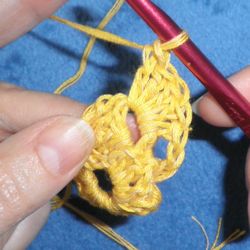
| Row 2 | Ch 1,5 fpdc into ring inserting hk from the back of the ring, ch 1, turn piece so the first 5 fpdc are on top … |
  |
|
 |
|
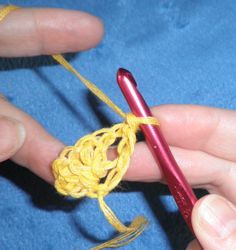
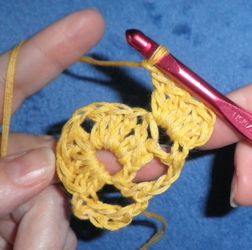
| 5 fpdc into other side of ring. | |
  |
|
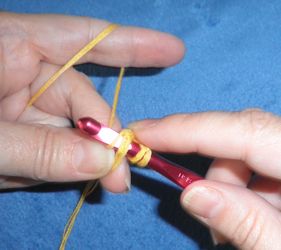
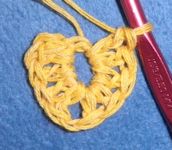
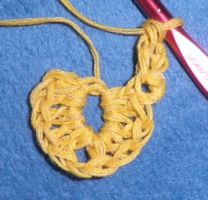
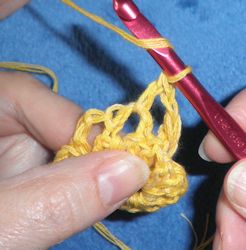
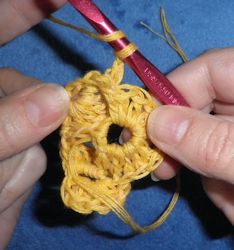
| Row 3 | Ch 1, insert hk into the two front lps of the last dc made and make a sl st … |
  |
|
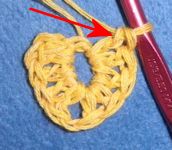
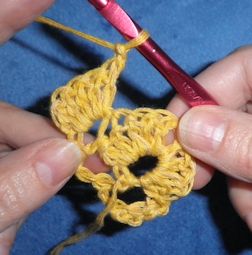
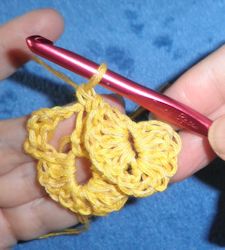
| ch 3, dc in same st, ch 2, dc in center of first crocodile st, ch 2, 2 dc in end of last dc of first crocodile st. | |
  |
|
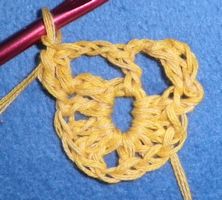
| Row 4 | Ch 1, turn the piece so the dc just made is at the top … |
 |
|
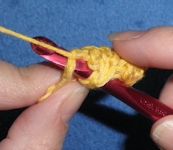
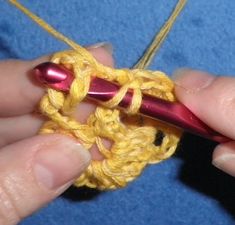
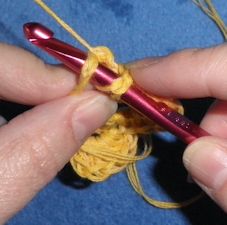
| 5 fpdc into side of first dc of row 3 … | |
   |
|
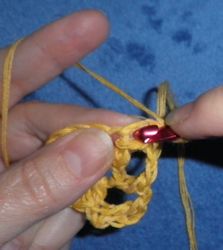
| ch 1, flip piece towards you so tip of first crocodile st is pointing to the right and front of piece is facing you … | |
 |
|
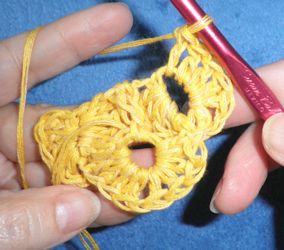
| 5 fpdc into second dc of row 3 … | |
   |
|
| sc in next dc … | |
 |
|
| 5 fpdc around next dc … | |
 |
|
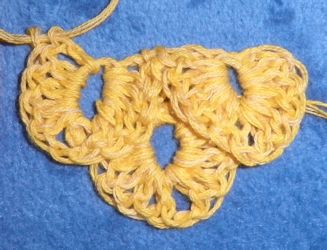
| ch 1, turn piece so front is facing you, 5 fpdc around last dc. | |
    |
|
| Continue adding a mesh row then a crocodile stitch row following the written instructions. | |
| Pattern and photos © Darlisa Riggs, CatBird Studios Modeled by Darlisa Riggs |
|