|
|
Sizes and Materials List …
|
|
| Size: | Instructions will fit a Baby’s 14” head, changes for Todder’s 16” head and Child’s 18” head are in brackets. |
| Hook(s): | US G/6 (4 mm) |
| Yarn: | Wildflower DK by Plymouth Yarn Company [51% cotton, 49% acrylic, 136 yds/50g skein] |
| Colors & Approx. Yardage: |
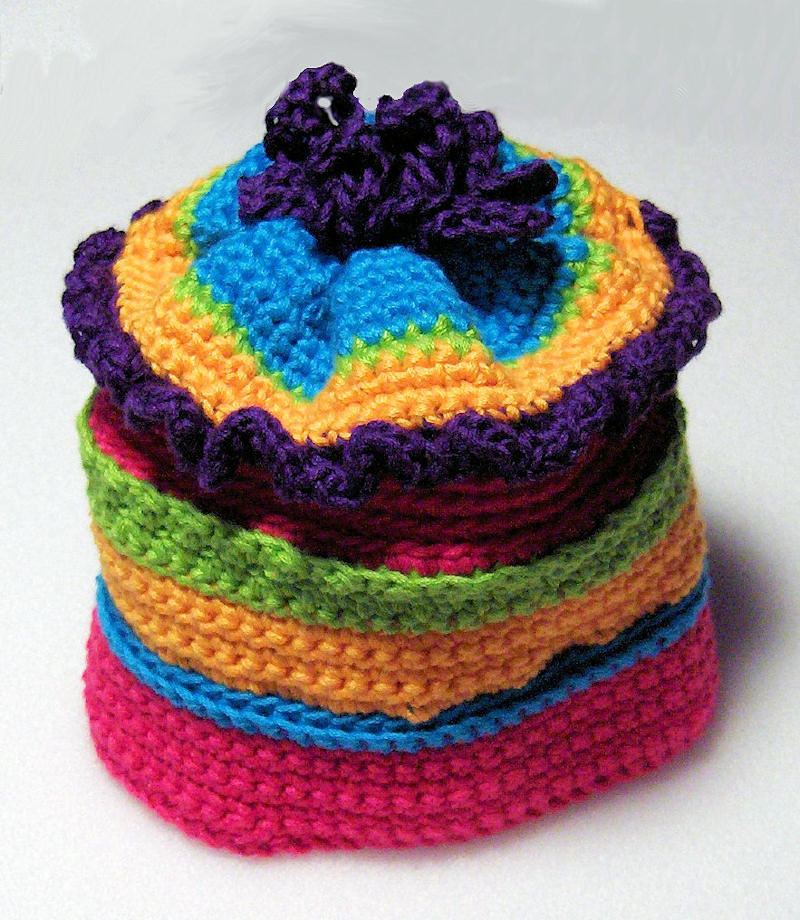
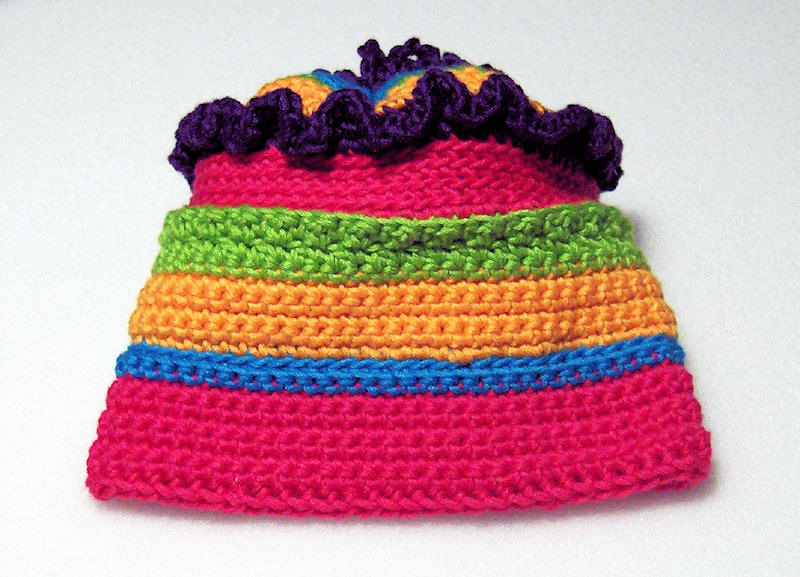
(A) Fuchsia #59 26[29, 32] yds (B) Aqua Blue, #55 20[23, 26] yds (C) Tangerine #79 16[18, 20] yds (D) Lime Green #58 12[14, 16] yds (E) Purple #45 Boys version 9[7, 8] yds; Girls version 15[16, 17] |
| Gauge: | 16 sts and 20 rows = 4”/10cm Always take time to check your gauge |
 |
|
|
Notes …
|
|
| Sizing | To increase the size, add 6 sc per each 2” increase, just make sure you increase by a multiple of 2 sc. |
| Special Stitches |
Foundation Single Crochet (fsc) Ch 2, insert hook into second ch from hook, yo, pull through, yo, pull through 1 loop on hook (base ch made), yo,pull through both loops on hook (sc made). *Insert hook into base ch, yo, pull through, yo, pull through 1 loop on hook (base ch made), yo, pull through both loops on hook.* Repeat from * across 68 times [78, 88] times. Join withsl st in top of first sc made. Don’t worry about the base chain hanging open. We’ll take care of that later. (70 sc made)[80 sc made, 90 sc made]. |
|
Instructions …
|
|
| Cap Base | |
| Base Chain | With A ch 70 [80, 90]. Join with sl st to form a ring. Make sure to not twist the ch as you connect the ring. (Number of stitches remains consistent for entire piece.) |
| Round 1 | Ch 1, turn, sc in each ch around, join with sl st in first sc. |
| Round 2-7 | *Ch 1, turn (WS), sc in each sc around, join with sl st in first sc.* Repeat from * to * five times ending at Round 7 (RS). Fasten off A. Mark the side facing you as the right side. |
| Round 8-9 | Turn piece so WS is facing you. Join B with sc in back loop of first sc, sc in back loop of each sc around, join with sl st in first sc. Ch 1, turn (RS), sc in back loop of each sc around, join with sl st in first sc and fasten off B. |
| Round 10 | Keeping the RS facing you, join C with sc in back loop of first sc. Continue sc in back loop of each sc around, joining with sl st in first sc. |
| Round 11-14 | *Ch 1, turn (WS), sc in each sc around, join with sl st in first sc.* Repeat from * to * three more times ending at Round 14 (RS). Fasten off C. |
| Round 15 | Turn piece (WS), join D with sc, sc in each sc around, join with sl st to first sc. |
| Round 16-17 | Ch 1, turn (RS),sc in first sc, dc in next sc, sc in next sc, dc in next sc, repeat from * to * around ending round with a dc. Join with sl st in first sc. Turn (WS), ch 1, sc in first dc, *dc in next sc, sc in next dc,* repeat from * to * around, ending with a dc in last sc. Fasten off D. |
| Round 18-21 | Turn piece (RS), join A with sc in back loop of first sc, sc in back loop of each sc around, join with sl st in back loop of first sc. *Ch 1 (do not turn), sc in back loop of each sc around, join with sl st in back loop of first sc.* Repeat from * to * for the next two rounds, remembering not to turn at end of each round. Fasten off A. |
| Round 22 | Do not turn piece (RS), join E to first back loop of first sc, sc in back loop of each sc around, join with sl st in first sc. Do not turn. |
| Round 23 | Ch 1, sc in front loop of each sc around, join with sl st in back loop of first sc. |
| Round 24a (girl’s version) |
Ch 1, turn (WS), 3 sc in back loop of each sc around, join with sl st in first sc. This will create a small ruffle on the front side. Join with sl st to first sc of ruffle, fasten off. |
| Round 24a (boy’s version) |
Ch 1, turn (WS), sc in each sc around, join with sl st in first sc, fasten off E. |
| Round 24b | With WS still facing, join C with sc to back loop of round 23, sc in back loop of Round 23 around, join with sl st in first sc. |
| Round 25 | Ch 1, turn (RS), sc in each sc around, join with sl st in first sc. |
| Round 26 | Ch 1, turn (WS), sc in each sc around, join with sl st in first sc, fasten off C. |
| Round 27 | With WS still facing, join D with sc to first sc, sc in each sc around, fasten off D. |
| Round 28 | Turn piece (RS), join B with sc to first sc, sc in each sc around. |
| Round 29-35 [29-39, 29-43] |
Ch 1, turn, sc in each sc around, join with sl st in first sc. At end of last round, fasten off leaving an 8-10-inch end for gathering the top of the hat.
Note: For every 1” you added for round 1, add 2 rows at the top for the length. |
| Weave end through all sts on last round, pull tight to gather, fasten off and secure. | |
| PomPom (optional) | |
| Option 1 | With E, ch 125-150. Fasten off end leaving 16” of yarn to use to attach the pompom. Thread the long end of yarn through a needle and attach the ch securely at the top of the hat with the first ch against the hat. Count off 10-12 chs and make a loop, attaching near the first ch. Continue looping the ch and attaching around the hole at the top. Once all loops have been attached, secure ends and weave in. |
| Option 2 | Use a pompom maker to make a pompom and attach securely to the top of the hat. |
| Ruffle (optional for girl’s version) | |
| Round 1 | If you used the sc foundation ch, thread A end on to needle and secure to opposite side of brim to close the gap. Secure and weave in ends.
With (RS) facing, join E to first back loop of first sc, sc in back loop of each sc around, join with sl st in first sc. Do not turn. |
| Round 2 | Ch 1, sc in front loop of each sc around, join with sl st in back loop of first sc. |
| Round 3 | Ch 1, turn (WS), 3 sc in back loop of each sc around, join with sl st in first sc. This will create a small ruffle on the front side. Join with sl st to first sc of ruffle, fasten off E. |
| Finishing … | |
| Weave in any ends using yarn needle. If you did not add the ruffle and used the sc foundation ch, finish the brim by threading A end on a needle and securing it to the opposite side of the brim to close the gap. Secure and weave in ends. | |
 |
|
| Pattern and photos © Darlisa Riggs, CatBird Studios | |