 |
|
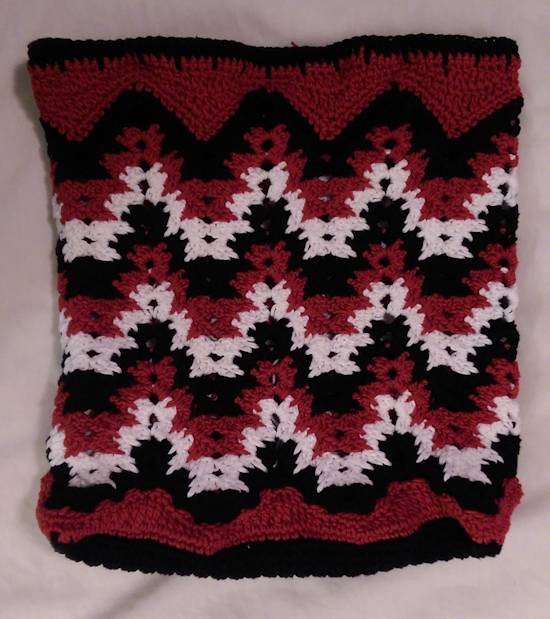
| I’m always up for a challenge and when I got the idea to convert my Granny Spiked My Ripple Blanket pattern into a purse, I had to go with it. Of course, I can see where my stitching and tension could be improved, but for a prototype, it came out fairly well. Also, don’t be afraid to change the closure strap and handles to match your preference. | |
|
Sizes and Materials List …
|
|
| Size: | 9.5″w x 10″ h x 3.25″ d |
| Hook(s): | US E/4 (3.50 mm) |
| Yarn: | Omega Sinfonia [100% Cotton, 218 yds/3.52 oz skein] |
| Colors &Approx. Yardage | (C1) Black, 218 yds (C2) White, 75 yds (C3) Red, 100 yds |
| Notions | Yarn Needle Straight Pins Stitch Marker Lining fabric, 1/2 yard, cotton Matching Thread Sewing Machine Sewing Needle Scissors Button or Toggle Clasp (Optional) Plastic Canvas |
| Gauge: | 17 sts and 22 rows = approx 4”/10 cm
Always take time to check your gauge |
  |
|
|
Notes …
|
|
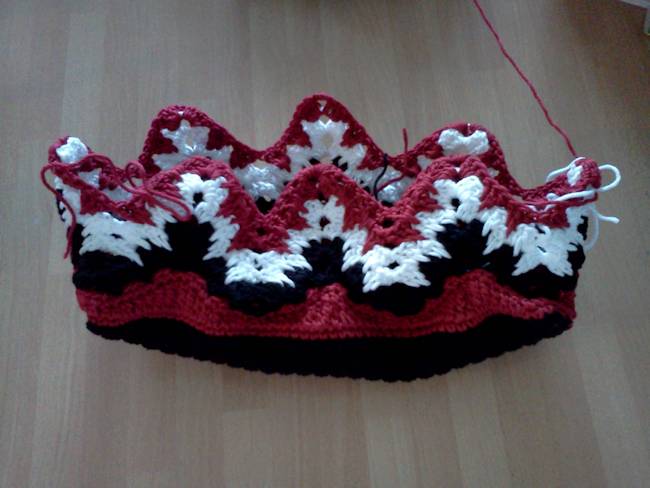
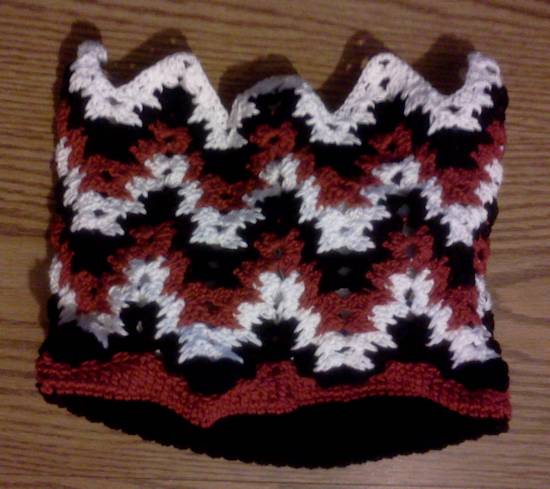
| Working | The spiked sts tend to pull in as you go so keep an eye on your work and if you see the sides start to pull in, loosen up on your sts. If needed check out some of the sample images in this pattern and you’ll see that it happened with my prototype purse. |
| Stitches Used | Chain (ch) Slip Stitch (sl st) Single Crochet (sc) Extended Single Crochet (esc) Half-Double Crochet (hdc) Extended Half-Double Crochet (ehdc) Double Crochet (dc) Extended Double Crochet (edc) Treble Crochet (tr) Extended Treble Crochet (tr) Double Treble Crochet (dtr) Extended Double Treble Crochet (edtr) Spike Stitch (spst) Beginning Spike Stitch (beg spst) Single Crochet Spike Stitch (sc spst) |
| Abbreviations |
Each (ea) Hook (hk) Loop (lp) Place Marker (pm) Right Side (RS) Skip (sk) Stitch(es) (st / sts) Yarn Over (yo) |
| Special Stitches | An extended st is made by starting the st, pulling up a lp through one lp on the hk, then finishing the st as normal.
Extended Single Crochet (esc) Insert hk into indicated st, yo, pull through, yo, pull through one lp on hk, yo, pull through both lps on hk. Extended Half-Double Crochet (ehdc) Yo, insert hk into indicated st, yo, pull through, yo, pull through one lp on hk, yo, pull through all three lps on hk. Extended Double Crochet (edc) Yo, insert hk into indicated st, yo, pull through, yo, pull through one lp on hk, [yo, pull through two lps on hk] twice. Extended Triple/Treble Crochet (etrc or etr) Yo 2x, insert hk into st, yo, pull through, yo, pull through one lp on hk, (yo, pull through two lps on hk) 3x. Extended Double Treble Crochet (edtr) Yo three times, insert hk into indicated st, yo, pull through, yo, pull through one lp on hk, [yo, pull through two lps on hk] four times. Spike Stitch (spst) The spike stitch is worked into the row that is 2 rows below the row you are adding. I found that if I worked into the top of the center/second dc, the st got pulled up too much and working into the sp between the second and third dc looked and worked better. See symbol chart for placement of spike. Dc into indicated sp, dc loosely between second and third dc on second row below one being made, dc into same sp as first dc. If your second dc isn’t loose enough for your liking, feel free to replace it with a treble crochet. Beginning Spike Stitch (beg spst) Ch 3 (or make standing dc) into indicated sp, turn, dc loosely between second and third dc on second row below one being made, dc into same sp as first dc. Single Crochet Spike Stitch (sc spst) The sc spike stitch is worked into the row below the row you are adding. Insert hk into the indicated st in the row below the next st, yo, pull through, yo, pull through both lps on hk. |
|
Instructions …
|
|
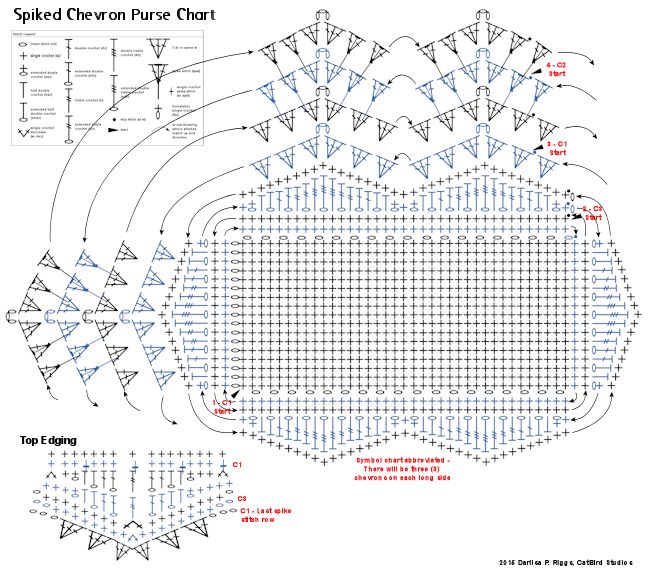
Chart made using the Crochet Charts software made by Stitch Works Software. |
|
| Purse Base | |
| Row 1 | Chart location – see “1 – C1 Start”With C1, fsc 17. |
| Row 2 | Ch 1, turn, sc in ea fsc across. |
| Rows 3-55 | Ch 1, turn, sc in ea sc across. Do not fasten off after last row. |
| Purse Sides – Lower Edge | |
| Round 1 | Still using C1, ch 1, turn piece so long edge is up, sc in the side of ea row down the long sides and in ea sc across both short sides. Join with sl st in first sc. Fasten off. Mark side facing you as rs. (144 sc)Note: There should be 17 sc across both short ends and 55 sc across both long sides. |
| Round 2 | Chart location – see “2 – C3 Start”With C3, join with sc to same st you just joined to, making sure right side is facing, sc in ea sc around, join with sl st in first sc. |
| Round 3 | Ch 1, esc in same st as joining, [hdc, dc, edc, trc, etrc, dtr, edtr, esc] over next 8 sc, ([sc, esc, hdc, dc, edc, trc, etrc, dtr, edtr, esc] over next 10 sc) 7 times, join with sl st in first esc. |
| Round 4 | Ch 1, sc in same st as joining and in ea st around, join with sl st in first sc. Fasten off. |
| Purse Sides – Main | |
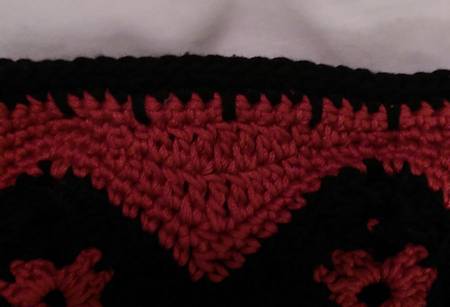
| Round 5 | Chart location – see “3 – C1 Start”With C1, join with sl st in sixth sc from where you fastened off round 4 (seventh sc from corner), ch 3 (beg dc) or make a standing dc, 2 dc in same st, *sk 2 sc, [3 dc, ch 3, 3 dc] in next sc (the sc at the top of the point), sk 2 sc, [3 dc in next sc, sk 2 sc, 3 dc in next sc] twice, sk 5 sc, [3 dc in next sc, sk 2 sc] twice,* rep from * to * around, to last corner, sk 5 sc, 3 dc in next sc, join with sl st in beg dc. |
| Round 6 | Ch 3 (or make a standing dc), turn, 2 dc in first sp (sp is between the two sets of 3 dc), *sk next sp, [3 dc in next sp] twice, [3 dc, ch 3, 3 dc] in next ch-3 sp,* rep from * to * around, 3 dc in next sp, join with sl st in beg dc. Fasten off but do not turn. Join C with sl st in sp to right of joining sl st. |
 |
|
| Spiked Rows | |
| Round 7 | Chart location – see “4 – C2 Start”With C2, beg spst in same sp as sl st, *sk next sp (at bottom point), spst in next 2 sps, [3 dc, ch 3, 3 dc] in ch-3 sp, spst in next 2 sps,* rep from * to * around, ending with spst in last sp, join with sl st in beg dc. |
| Round 8 | Rep round 7. Fasten off but do not turn. |
| Rounds 9-10 | Rep rounds 7 and 8 with C3. |
| Rounds 11-24 | Rep rounds 7 and 8 with C1, C2, and C3, twice, then with C1 only. |
 |
|
| Purse Sides – Top Edging | |
| Round 25 | With RS facing, join C3 with sl st in any dc immediately to the left of any ch-3 sp, ch 1, sc in same st, sc in next 6 dc, *sc2tog in second dc of next two spsts, sc in next 7 dc, [sc, ch 3, sc] in next ch-3 sp, sc in next 7 dc,* rep from * to * around ending with [sc, ch 3, sc] in last ch-3 sp, join with sl st in first sc. |
| Round 26 | Ch 1, sc in same st as joining, pm, sc in next 6 sc, *sc2tog in next two sc (sk previous sc2tog), sc in next 7 sc, [sc, ch 2, sc] in next ch-3 sp, sc in next 7 sc,* rep from * to * around ending with [sc, ch 2, sc] in last ch-3 sp, join with sl st in first sc |
| Round 27 | Ch 1, sc in same st as joining, pm, [sc, esc, hdc, ehdc, dc, edc] over next 6 sc, *trc in sc2tog, [edc, dc, ehdc, hdc, esc, sc, sc] over next 7 sc, sc in ch-2 sp, [sc, sc, esc, hdc, ehdc, dc, edc] over next 7 sc,* rep from * to * around ending with sc in ch-2 sp, sc in next sc, join with sl st in first sc. |
| Round 28 | Ch 1, sc in same st as joining, pm, *[sc, esc, hdc, ehdc, dc, edc, trc, edc, dc, ehdc, hdc, esc, sc, sc2tog, sc2tog, sc] over next 18 sts, rep from * around, join with sl st in first sc. |
| Round 29 | Ch 1, sc in same st as joining, pm, sc in ea st around, join with sl st in first sc. Fasten off. |
| Round 30 | With A, join with sl st in same st as joining, pm, sc in next sc, *sc spst in next st of row below, sc in next 3 sc, rep from * around, ending with sc spst, join with sc in first sc. |
| Round 31 | Ch 1, sc in same st as joining, pm, sc in ea st around, join with sl st in first sc. Fasten off. |
 |
|
| Finishing | |
| Weave in all ends. You can also add a lining now or wait until after the straps are added. To add some stiffness, tack pieces of plastic canvas into the purse before adding the lining or, make a double lining and place the plastic canvas pieces inside the double lining before stitching up the top. Instructions are included at bottom of pattern on adding a lining. | |
|
Note how the sides are pulled in because I wasn’t paying attention to how the spike stitches were pulling the piece in. |
|
| Purse Strap at Sides – Make 1Purse Strap at Front/Back – Make 2 | |
| Row 1 | With C1, leave a long tail for sewing and fsc 159. This will make the strap about 30″ long. To make longer or shorter, add or subtract in groups of four sts. |
| Row 2 | Ch 1, turn, sc in ea fsc across. Join C3 at end of row, fasten off C1. |
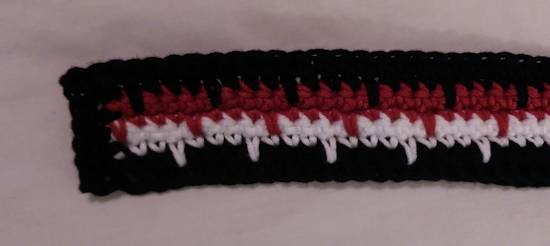
| Row 3 | With C3, sc in first 3 sc, sc spst in next st of row below, *sc in next 3 sc, sc spst,* rep from * to * across to last 3 sc, sc in last 3 sc. Mark as right side. |
| Row 4 | Ch 1, turn, sc in ea sc across. Join C2 at end of row, fasten off C3. |
| Row 5 | With C2, sc in first 2 sc, sc spst in next st of row below, *sc in next 3 sc, sc spst,* rep from * to * across to end, ending with a sc spst in last sc. |
| Row 6 | Ch 1, turn, sc in ea sc across. Join C1 at end of row, fasten off C2. |
| Row 7 | With C1, sc in first sc, sc spst in next st of row below, *sc in next 3 sc, sc spst,* rep from * to * across to last sc, sc in last sc. |
| Row 7a | Ch 1, turn piece so short edge is up and sc in the side of ea sc across. (7 sc) |
| Row 7b | Ch 1, turn, sc in each sc across. (7 sc) |
| Suggestion: Before continuing, weave in all ends at the opposite end of the strap so they are out of the way before doing the sc across the short end. | |
| Row 8 | Ch 1, turn so long edge is up, sc in ea sc across. |
| Row 8a | Ch 1, turn piece so short edge is up, sc in the side of ea sc across. (8 sc) |
| Row 8b | Ch 1, turn, sc in ea sc across. (8 sc) Fasten off leaving a long tail for sewing. |
| Weave in all ends except for long tails which will be used for sewing the strap on to the purse. Follow the instructions below depending on whether you attaching the straps at the sides or at the front and back. | |
 |
|
| Attach Straps – Side of Purse | |
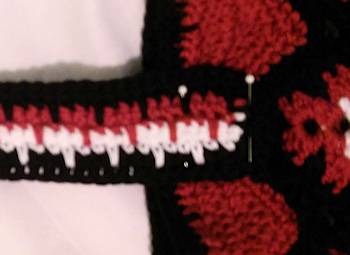
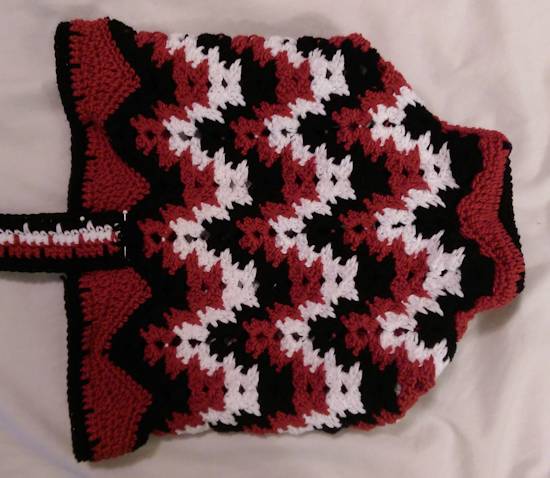
| Fold purse in half so side is facing you as shown below. Place one end of the strap, rs up, at the center point of the top chevron. The example overlapped it a bit to make sure there was enough room to safely attach the strap to the bag. Place straight pins to hold the end in place. | |
|
Placement of strap at side of purse |
|
|
|
|
| Repeat on other side making sure you don’t twist the strap. | |
| Using the long tails or a separate piece of yarn, sew the handles on to the purse along the C1 rows. When you get to the top of the purse, make sure you only go through the bottom of the strap so the yarn doesn’t show through the C2 and C3 rows. If you plan on adding lining, only sew up to the edge of the C1 rows at the top of the purse. Weave in ends. | |
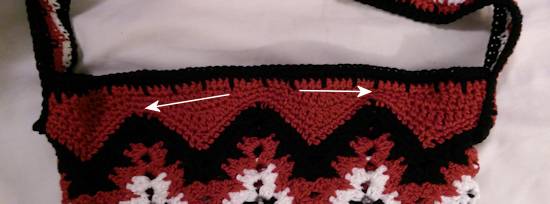
| Attach Straps – Front and Back of Purse | |
| Pin the straps, rs up, as shown above but instead of attaching them at the sides, attach them at the front and back as shown below by the white arrows. Make sure to not twist the straps. | |
 |
|
| Closure Strap | |
| Row 1 | With C1, leave a long tail for sewing and fsc 33. This will make the strap about 6″ long. To make longer or shorter, add or subtract in groups of three sts. |
| Row 2 | Ch 1, turn, sc in ea fsc across. Join C3 at end of row, fasten off C1. |
| Row 3 | With C3, sc in first 2 sc, sc spst in next st of row below, *sc in next 2 sc, sc spst,* rep from * to * across to end. Mark as right side. |
| Row 4 | Ch 1, turn, sc in ea sc across. Join C2 at end of row, fasten off C3. |
| Row 5 | With C2, sc in first sc, sc spst in next st of row below, *sc in next 2 sc, sc spst,* rep from * to * across to last 3 sc, sc in next sc, sc sp st, sc in last sc. |
| Row 6 | Ch 1, turn, sc in ea sc across. Join C1 at end of row, fasten off C2. |
| Row 7 | With C1, sc spst in first sc, *sc in next 2 sc, sc spst,* rep from * to * across to last sc, sc in last 2 sc. |
| Row 7a | Ch 1, turn piece so short edge is up and sc in the side of ea sc across. (7 sc) |
| Row 7b | Ch 1, turn, sc in each sc across. (7 sc) |
| Suggestion: Before continuing, weave in all ends at the opposite end of the strap so they are out of the way before doing the sc across the short end. | |
| Row 8 | Ch 1, turn so long edge is up, sc in ea sc across. |
| Row 8a | Ch 1, turn piece so short edge is up, sc in the side of ea sc across. (8 sc) |
| Row 8b | Ch 1, turn, sc in ea sc across. (8 sc) |
| Clasp Loop | |
| Ch 1, turn, sl st in first sc, pm, ch 7, join with sl st in last sc at other end of short edge, ch 1, turn, 12 sc in ch-7 sp, join with sl st in marked st.Fasten off leaving a long tail for sewing. | |
 |
|
| Attach Closure | |
| Find the center back of the purse and pin and sew the flat end of the closure strap the same way you attached the straps. Make sure the RS of the closure strap is facing up. | |
 |
|
| Fold the closure strap over the top of the purse to the front and decide where the clasp toggle will be placed and mark with a pin or stitch marker. | |
| Attach clasp toggle or button using C1. | |
| Finishing … | |
| If you haven’t already, weave in all ends and add a lining. | |
| Lining | |
| In order to be able to show the stitching on the lining, the sample below uses a light gray fabric up until I show how to add the plastic canvas and stitch the lining into the purse. | |
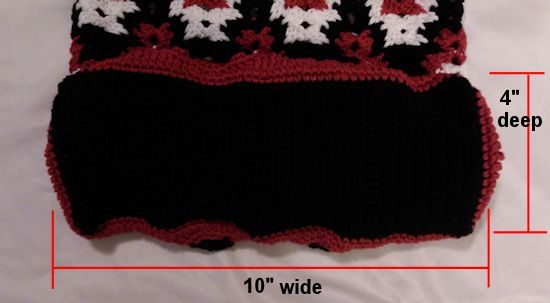
| 1. Measure the base of the purse to get the width and depth measurements. For our sample, the measurements are 10″ wide and 4″ deep. | |
 |
|
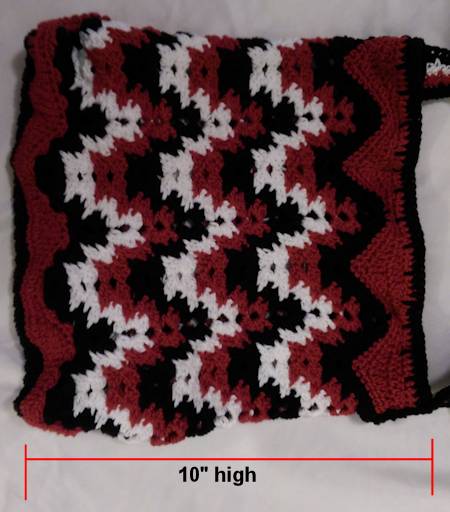
| 2. Measure one side of the purse to get the heighth. Our sample is 10″ high. | |
 |
|
3. Cut two pieces of fabric with the following measurements:
|
|
| 4. Sew up the two sides of both fabric pieces with a 1/4″ seam allowance then ziz zag the edges | |
 |
|
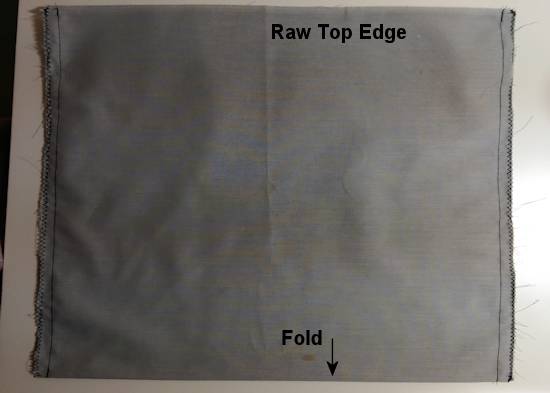
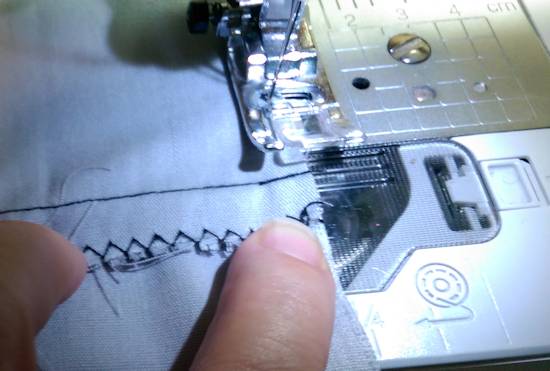
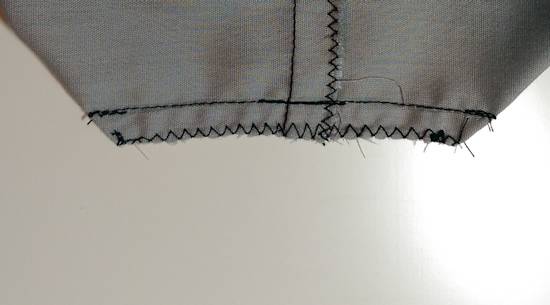
| 5. Zig zag along the top raw edge, pressing each seam towards you and sewing over it. | |
 |
|
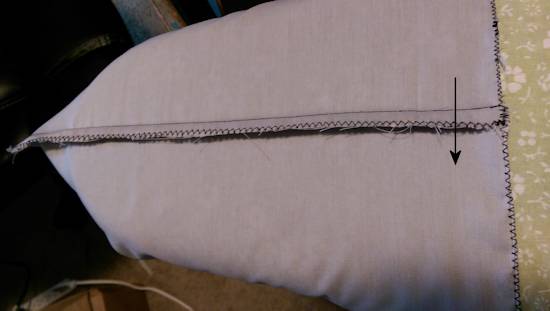
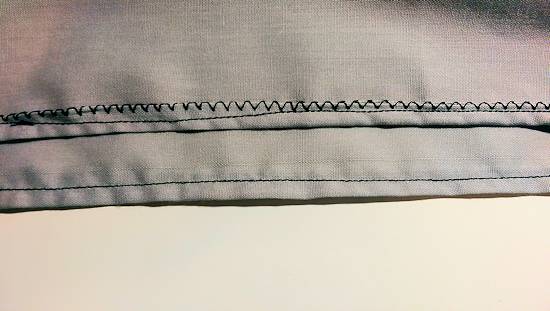
| 6. Press both seams down in the same direction you zig zagged it down at the top. By doing this, when the second piece is turned right side out and this one is placed inside it, the seams will be on opposite sides which helps to eliminate some bulk. | |
 |
|
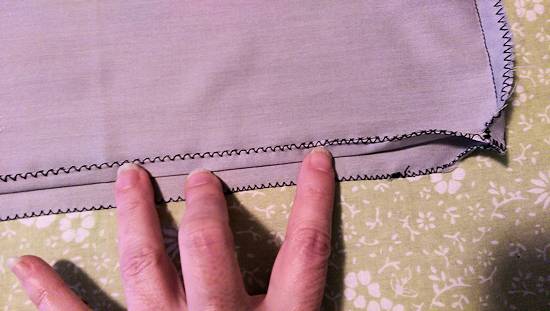
| 7. If the fold line isn’t obvious, lightly press on the fold so it can be used as a guideline for the base. | |
 |
|
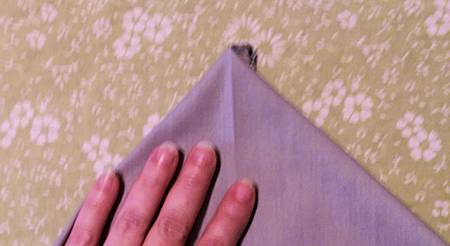
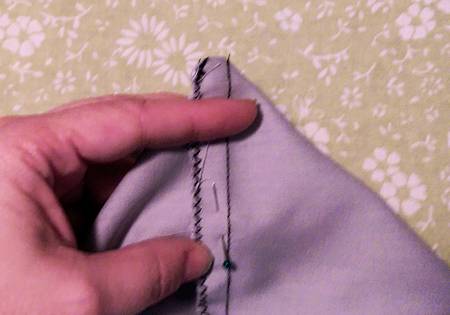
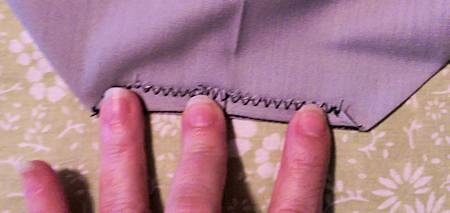
| 8. Open one of the bags and lay the side seam along the pressed edge of the base to form a triangle. Use your fingers to feel for the seam and make sure the fold line on the base lines up. Pin the corners together. | |
 |
|
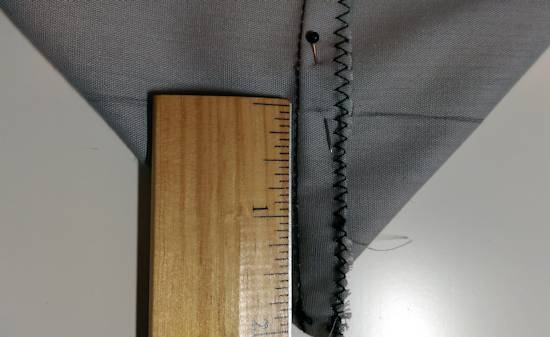
| 9. Using a ruler, place a mark up from the tip of the triangle that is 1/2 the base depth. For example, our sample has a base that is 4″ deep so our measurement would be made 2″ up from the tip of the triangle. Use your ruler to draw a seam line across the corner. | |
 |
|
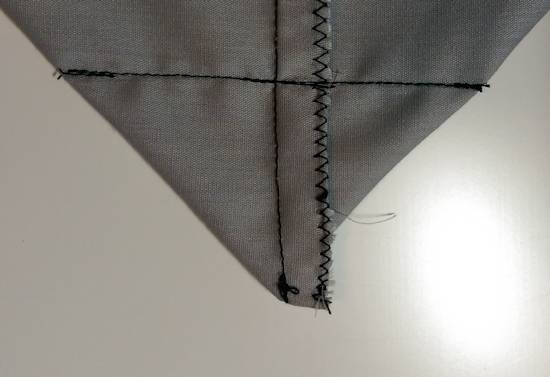
| 10. Sew along the line just drawn making sure to backstitch at the beginning and end. I usually backstitch over the center as well just to add a bit of extra strength there. Repeat on other side. | |
 |
|
| 11. Trim the corner seams to 1/4″ and zig zag the edges. | |
 |
|
| 12. Fold the corner seams toward the base and press. | |
 |
|
| 13. Press the top of the bag down 1/4″. | |
 |
|
| 14. Top stitch the fold down or, wait until you put the two lining pieces together and stitch down through both pieces. | |
 |
|
| 15. Repeat for second lining piece. | |
| 16. If adding plastic canvas to stiffen the purse sides, cut the pieces so they are slightly smaller than the purse measurements. You can add the plastic canvas to all sides and the bottom or just to the bottom. | |
| 17. Turn one lining piece right side out and insert the base piece into it. Tack it down in a few places using a needle and thread. | |
| 18. Insert the second lining piece into the first one, lining up the bottom and side seams. | |
| 19. If stiffening the sides, insert each plastic canvas piece into the sides and front/back, tacking them down through both lining pieces. Make sure you insert the front/back pieces with the shorter side (9″) as the height. | |
| 20. Pin the top edges together and stitch together following the same thread line made when you sewed down the top fold. | |
| 21. Insert lining into purse, making sure the bottom section with the plastic canvas insert matches up to the purse base. | |
| 22. Pin the lining in the purse at the top and sew in. This can be done with hand sewing or with a sewing machine. | |
 |
|
| Pattern and photos © Darlisa Riggs, CatBird Studios | |
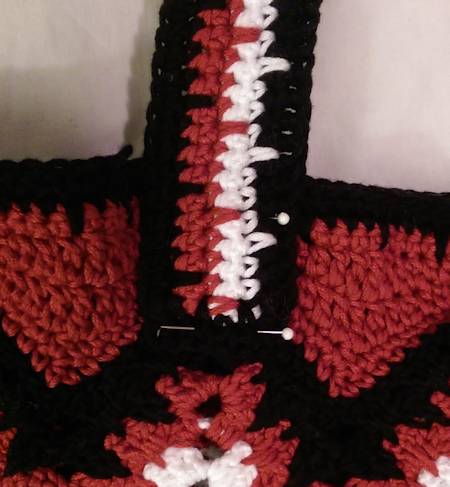 Close up of strap placement, overlapping top of chevron point but kept above the “hole”