 |
|
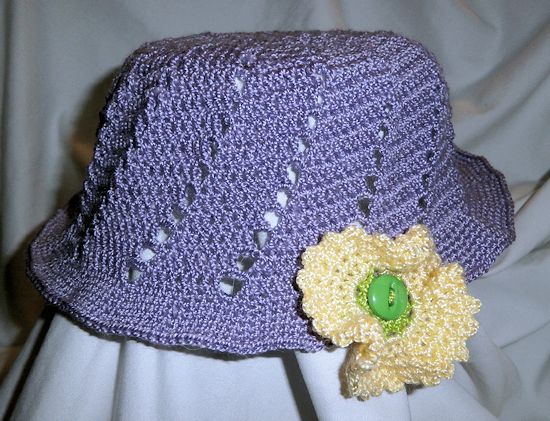
| This hat is a variation of the Dorothea Sun Hat/Beanie without the fpdc which should make it suitable for either a boy or girl. Like with the Dorothea Sun Hat/Beanie, add crocheted flowers, buttons, or other trims to add some sparkle to the hat. Leave off the brim for a beanie or change colors every round!While the pattern is written using size 5 crochet thread, it can also be worked up using thicker or thinner thread, just make sure the measurements for the size being made are followed. Included sizes are from newborn to adult female. Also included is a simple flower pattern but feel free to use any flower pattern you like instead.Named after my paternal grandmother, Celian Ann. | |
|
Sizes and Materials List …
|
|
| Size: | 0-3 mths, 3-6 mths, 6-12 mths, 1-3 years, 3-10 years, 11 years- Adult Female |
| Hook(s): | US E/4 (3.50 mm)For a sturdier hat, use the recommended hk size for the thread being used. For a lacier version, use a hk size that is at least twice the recommended size for the thread being used. |
| Yarn: | Crochet thread, size 5, any composition, just make sure it is a soft thread like Hobby Lobby Artiste, or any thin yarn |
| Colors & Approx. Yardage |
Any color, 185-200 yd Flower, approx. 5 yds |
| Notions | Yarn Needle Button for flower center (optional) |
| Gauge: | Gauge is not important for this pattern. Just make sure you follow the provided measurements for the size being made. |
  |
|
|
Notes …
|
|
| Stitches Used | Chain (ch) Slip Stitch (sl st) Single Crochet (sc) Half Double Crochet (hdc) Single Crochet Decrease (sc dec) Double Crochet (dc) Reverse Slip Stitch (reverse sl st) |
| Abbreviations | Each (ea) Skip (sk) Stitch(es) (st / sts) |
| Special Stitches | Reverse Slip Stitch (reverse sl st)
Worked the same as a reverse sc (crab st) but using a sl st instead of a sc.Insert hk into previous st (to right of hk), from front to back, yo and pull through all lps on hk Single Crochet Decrease (sc dec) Insert hk into next st, yo and pull through one lp, insert hk into next st, yo and pull through one lp, yo and pull through all lps on hk. Invisible Join – click on link for written and video instructions. |
|
Instructions …
|
|
| Crown | |
| Ring | Ch 5, join with sl st in first ch. |
| Round 1 | Ch 3 (beg dc here and throughout), 15 dc in ring, join with sl st in beg dc. (16 dc) |
| Round 2 | Ch 4, *dc in next dc, ch 1,* rep from * to * around, join with sl st in beg dc. (16 dc, 16 ch-1 sps) |
| Round 3 | Ch 3, dc in same st as joining, ch 1, [2 dc in next dc, ch 1] 15x, join with sl st in beg dc. (32 dc, 16 ch-1 sps) |
| Round 4 | Ch 3, dc in next dc, ch 2, [dc in next 2 dc, ch 2] 15x, join with sl st in beg dc. (32 dc, 16 ch-2 sps) |
| Round 5 | Ch 3, dc in same st as joining, dc in next dc, ch 2, *2 dc in next dc, dc in next dc, ch 2] 15x, join with sl st in beg dc. (48 dc, 16 ch-2 sps) |
| Round 6 | Ch 3, dc in same st as joining, dc in next 2 dc, ch 2, [2 dc in next dc, dc in next 2 dc, ch 2] 15x, join with sl st in beg dc. (64 dc, 16 ch-2 sps) |
| Rounds 7+ | Rep increase pattern below until measurement from center of crown to edge reaches the length shown for the size being made:Ch 3, dc in same st as joining, dc in ea dc to next ch-2 sp, ch 2, [2 dc in next dc, dc in ea dc to next ch-2 sp, ch 2] 15x, join with sl st in beg dc.
Crown Measurement from Center to Outer Edge: |
| Sides | |
| Round 1 | Ch 3, dc in same st as joining, dc in ea dc skipping the dc in front of the ch-2 sp, ch 2, [2 dc in next dc, dc in ea dc skipping the dc in front of the next ch-2 sp, ch 2] 15x, join with sl st in beg dc. |
Examples:
|
|
| Rounds 2+ | Rep round 1 until measurement from center of crown to edge (middle of ear) reaches the length shown below for the size being made:
0-3 months – 5.5″ |
| Band – Beanie | |
| Round 1 | Ch 1, sc in same st as joining and in ea st around with one sc in each ch-1 and ch-2 space, join with sl st in first sc. |
| Rounds 2-3 | Ch 1, sc in same st as joining and in ea st around, join with sl st in first sc. |
| Round 4 | Ch 1, sc in same st as joining, sc in next 7 sc, sc dec over next two sc, *sc in next 8 sc, sc dec,* rep from * to * around, join with sl st in first sc. |
| Round 5 | Ch 1, sc in same st as joining, sc in next 2 sc, sc dec over next two sc, *sc in next 7 sc, sc dec,* rep from * to * around, join with sl st in first sc, |
| Round 6 | Ch 1, sc in same st as joining, sc in ea sc around, join with sl st in first sc.If not adding the rev sl st edging or picot edging, cut thread (do not fasten off) and join to first sc with an invisible join. |
| Reverse Slip Stitch Edging – Optional | |
| Round 5 | Ch 1, do not turn, make a rev sl st into the next sc to the right of the hk, continue making a rev sl st into ea sc around to last sc before the first rev sl st (do not make a rev sl st in the last sc), cut thread (do not fasten off) and join to first rev sl st with an invisible join. |
| Brim – Sun Hat | |
| Round 1 | Ch 1, sc in same st as joining and in ea st around with two sc in each ch-2 space, join with sl st in first sc. |
| Round 2 | Ch 1, sc in same st as joining, sc in next 4 sc, *2 sc in next sc, sc in next 5 sc,* rep from * to * around, join with sl st in first sc. Don’t worry if the end of the round has less than 5 sc after last 2 sc. |
| Rounds 3-4 | Ch 1, sc in same st as joining, sc in ea sc around, join with sl st in first sc. |
| Round 5 | Ch 1, sc in same st as joining, sc in next 2 sc, *2 sc in next sc, sc in next 6 sc,* rep from * to * around, join with sl st in first sc. |
| Rounds 6-7 | Ch 1, sc in same st as joining, sc in ea sc around, join with sl st in first sc. |
| Round 8 | Ch 1, sc in same st as joining, sc in next 6 sc, *2 sc in next sc, sc in next 7 sc,* rep from * to * around, join with sl st in first sc. |
| Round 9 | Ch 1, sc in same st as joining, sc in ea sc around, join with sl st in first sc. |
| For a wider brim, continue to next rounds, otherwise, sk to Edging round. | |
| Round 10 | Rep round 9. |
| Round 11 | Ch 1, sc in same st as joining, sc in next 4 sc, *2 sc in next sc, sc in next 8 sc,* rep from * to * around, join with sl st in first sc. |
| Round 12 | Rep round 9. |
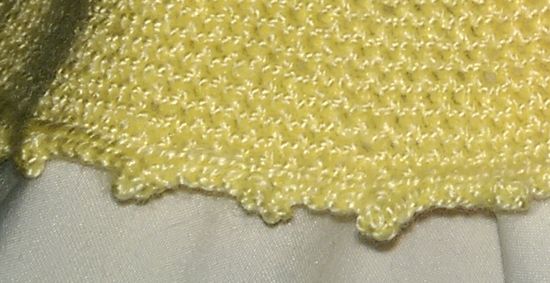
| Picot Edging – Optional | |
| Ch 1, sl st in back lp of same st, sl st in back lp of next 4 sts, *ch 3, sl st in back lp of same st (picot formed), sl st in back lp of next 5 sts,* rep from * to * around.Note: If you work the picots in both lps of the st, it will bend forward/up. | |
 |
|
| Finishing … | |
| Weave in ends. Add flower(s) if wanted using the pattern below or your favorite flower pattern. Wash and block as needed. | |
| Flower – Center | |
| Round 1 | With center color, leaving a long tail to use to attach flower to hat and using a magic circle, ch 2 (beg hdc), 5 hdc in circle, join with sl st to beg hdc. (6 hdc) |
| Round 2 | Ch 2, hdc in same st as joining, 2 hdc in ea hdc around, join with sl st to beg hdc. Fasten off. (12 hdc) |
| Flower – Petals | |
| Round 3 | With petal color, join to any hdc of center with a sl st, ch 1, [sc, hdc, dc] in same st, [dc, hdc, sc] in next st, *[sc, hdc, dc] in next st, [dc, hdc, sc] in next st,* rep from * to * around, join with sl st to first sc. |
| Round 4 | Ch 1, sc in same st as joining, ch 1, *sc in next st, ch 1,* rep from * to * around, join with sl st to first sc. |
| Round 5 | Ch 1, sc in first ch-1 sp, ch 2, sc in same ch-1 sp, [sc, ch 2, sc] in ea ch-1 sp around, join with sl st in first sc. |
| Round 6 | Ch 1, sc in first ch-2 sp, ch 3, sc in same ch-2 sp, [sc, ch 3, sc] in ea ch-2 sp around, join with sl st in first sc. Fasten off. |
| Finishing … | |
| Weave in end from petals. Use long end from flower center to attach to the right side of the hat. If adding a button, sew button on at the same time. Weave in end after joining flower to hat. | |
| Pattern and photos © Darlisa P. Riggs, CatBird Studios | |