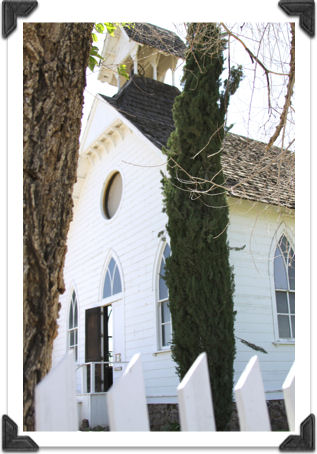
| When Brent and I became engaged in June 2009, it didn’t take me long to come up with the idea to crochet my wedding dress, especially because I had more than a year until our wedding date, which is 10/10/10, to correct any mistakes! In addition, our wedding would take place at the Pioneer Living History Museum in Phoenix, Arizona. The rustic, wild west village had been created as a turn-of-the-20th-century small town, and schoolchildren of all ages visit to learn more about history. The village’s founders brought in aged buildings from across Arizona and set them on a main dirt road. The little white, wooden church where we will marry has a small belfry above the front door, and was built in the 1880’s. A real-life blacksmith mans the blacksmith shop (and has been there for 32 years!) and nearby is a bank building, a teacher’s log home, a yellow Victorian-style home with white trim, a jail, a carpenter’s shop and a two-story brick Opera house (where we’ll hold the reception dinner). Arizona may still be warm in October, so I decided a dress crocheted in 100% white cotton would work best for comfort, and would go perfectly with the quaint charm of the location.
My grandmother taught my mother to crochet, and my mother taught me when I was a pre-teen, but I didn’t really get into crocheting until I was 15 years old. Then, I crocheted mostly afghans as gifts. I continued to crochet over the years, once making mittens that looked like alligators for children, but mostly making afghans out of sport weight yarns, or place mats and larger tablecloths out of smaller yarns/threads and tinier needles. Crocheting has always felt relaxing to me, almost meditative, and a way to recharge. After Brent and I met (at the ages of 45 and 44 respectively), he began calling me Fists of Fury as I churned out gifts of afghans, dish towels, and shawls each Christmas. |
|
|
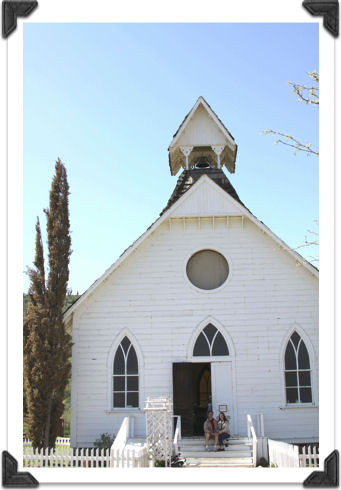 Brent Fisher and Cindi Brown (me) on front steps of Pioneer Living History Museum church in Phoenix, Arizona |
I’m sharing this story because I’m not an expert crocheter and believe my skills are probably average. My hope is that someone reads how I managed to create a one-of-a-kind dress to make my wedding day more special and they are inspired to create a similarly special item for their special day, or for a loved one’s special day! My dress isn’t perfect, but it’s perfect for me and it’s perfect for our wedding location. Even though it’s a vintage pattern, the length of it creates an elegant silhouette. I could also envision a dress of finer silk yarn, perhaps in off-white or ecru, with more delicate floral patterns crocheted in. The silk would be perfect for a more formal setting.
I married young and divorced relatively young, so this is not my first wedding, and I’m not a traditional bride. I’ve never dreamed of a big, fancy wedding dress, or a fantasy wedding, so making my own wedding dress doesn’t feel as risky as it would for someone who dreams of a fairy tale dress and day. My hope in sharing my crochet adventures is to transfer a little courage to anyone reading who might have an inclination to take on a project of this importance and make it their own through their creativity and passion! When I mentioned to a couple of people that I was crocheting my wedding dress, a funny expression crossed their faces, as though they were thinking, “how tacky.” So I stopped telling people and focused on making the dress. But first, I had to find a pattern and searched the internet, coming up with very few options. Chris Bacon in Edinburgh, Scotland, manages the website Yesterknits.com, and she offered a free wedding dress pattern from the late 1800s, as well as a 1970s British wedding dress pattern for $5.00USD. Chris has five times as many knit patterns as crochet, but her site is great if you’re looking to crochet retro pieces. I asked for the free wedding dress pattern, which Chris sent via e-mail, but I immediately decided the dress was too bulky in appearance. |
|
| My only experience crocheting clothes was a yellow cotton skirt I crocheted in 2006 and lined with cream-colored satin. The skirt came out nicely and I get tons of compliments every time I wear it. I started sewing clothes in my early teens and used my skills of cutting sewing patterns to understand how sheets of “fabric” can be crocheted into various shapes and then assembled, just like assembling pieces of fabric by sewing. Based on this shallow experience of having crocheted one skirt, I ordered Chris’ vintage 1970s wedding pattern, paid via PayPal, and she mailed a black and white copy of the pattern from its original publication as a magazine spread. I put the pattern pages into clear plastic sleeves to protect them from wear (because I’d be handling them constantly for months). Names for crochet stitches vary between the U.S. and the U.K., so Chris also emailed a document comparing the stitch names and needle sizes, which was extremely useful. For instance, a single crochet in the U.S. is referred to as a double crochet in the U.K., and a double crochet in the U.S. is referred to as a treble crochet in the U.K. Most books about crochet also have these comparison charts. | 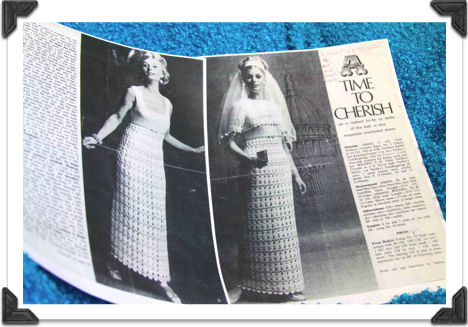 Black and white copy of 1970’s British wedding dress pattern, purchased from www.yesterknits.com in Scotland |
|
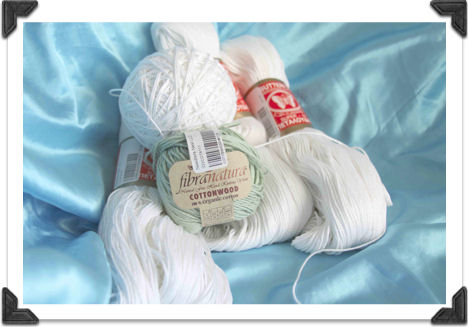 White and green cotton yarn for wedding dress |
The women at Needler’s Nest immediately became interested in my project and offered wonderful advice and support. After discussing options, we all seemed to land simultaneously on white Butterfly mercerized cotton yarn, size 10, made in Greece (125 grams per skein). Yarn has changed greatly since the 1970s, so I needed their expertise in choosing the correct weight yarn for the dress. The retail price of the mercerized cotton yarn was $12.60 per skein, but it was on sale at 25% off, which made a big difference in price, especially when we estimated the dress would require 11 skeins. With only two skeins of the white cotton yarn in the store, they placed an order for more and promised me the sale price, even though the yarn arrived after the sale was over. I truly appreciated getting the sale price! One saleswoman kept insisting I sew seed pearls onto the dress, so I kept that suggestion in mind as the pieces of the dress came together.
Our wedding color is a soft green, and I wanted to use just a tiny touch of the green on the dress, as a ribbon running around the empire waist. I chose a 100% organic cotton yarn called Cottonwood from Fibranatura in a 50 gram ball for $7.00 (because they were also on sale with a 25% discount, I bought two balls). |
|
| When the yarn arrived, I took the advice of Lily Chin in her newest book, “Crochet Tips & Tricks: Shortcuts and techniques every crocheter should know.” Two-time titleholder of “The World’s Fastest Crocheter,” Chin says all yarns should be worked into a swatch, then washed and blocked to see how the yarn will behave. I crocheted an 8-inch square swatch of single crochets and washed it, then laid it out to dry. The fiber held together beautifully and kept its luster and shape, so I decided the next step would be to wash all the yarn before using it, to avoid shrinkage later.
Do NOT do what I did to wash my yarn. Thinking the gentle cycle on the washing machine was, in fact, gentle, I took ten loops of 125 grams each of cotton yarn and carefully placed them over the center pole in the washing machine drum, added Wool-lite, and left the machine to do its magic. Five minutes later, doubts about the gentle cycle exploded in my brain and I rushed to the machine. As I suspected a bit too late, the agitation wasn’t gentle at all, but rather caused the yarn strands to clutch each other. What a mess, and how dumb I felt. I placed all the loops on towels on the dining room table (which has a glass top) and waited for the arid Arizona climate to work its magic. I flipped the loops the next day, and felt they were ready to wind into balls on the second day. Over the next two weeks, I spent my evenings watching TV while winding the yarn into balls, which would be much easier to crochet from than the tangled skeins. Sometimes the skein loops were badly tangled, and sometimes they were not. The average time it took to unravel each skein was about 2.5 hours. Not my proudest moment, but I share this so you won’t ever suffer the same fate! |
||
| I crocheted the bodice of the dress while waiting for the yarn to dry. The bodice was worked exclusively in single crochet stitches in two pieces, front and back, with straps, which I made about an inch and a half wide. I worked two or three rows of single crochet as edging around the front and back neckline, and the armholes once the two pieces were connected. I wanted to make the straps slightly wider than the pattern called for to add more strength for holding the dress up. I fitted the bodice pieces to my frame as I worked it, but even after carefully fitting it throughout the process, the bodice was slightly loose. I took in the right side seam another one-half inch. I also reinforced the shoulder seams where the straps come together, to strengthen the entire bodice and to take up a little slack. These adjustments are why it’s good to give yourself several months to complete such an important project. | 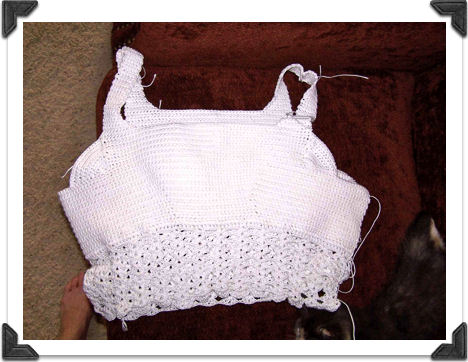 Unfinished dress bodice with initial skirt scallop rows, from front |
|
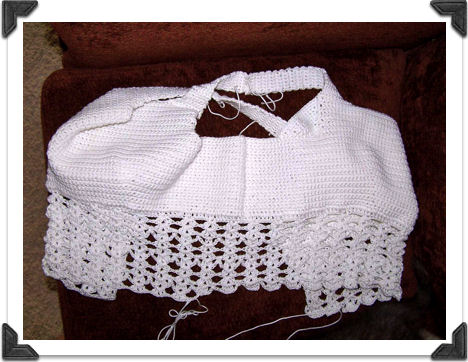 Unfinished dress bodice with initial skirt scallop rows, from side opening where 18-inch zipper will be inserted |
Once the yarn was in balls and the bodice was complete, I began work on the skirt, which is worked in rounds of a scallop pattern. After working several rows in low light in the evenings, I noticed the last few rows had a smudged/dark look to them in the sunlight. Perhaps one of the yarn skeins had become discolored in the process of winding it. I was discouraged, thinking those rows of scallops would have to come out and concerned that other skeins of yarn might be discolored from my numbskull idea to wash yarn in a machine! Slightly dejected, I set the project aside for a week and didn’t have the heart to go back to it.
Like most ideas, a thought occurred to me out of nowhere: I should try to wash the discolored rows of scallops by hand before giving up on the project! And that’s what I did, using my bathroom sink and a capful of Wool-lite. I was a little concerned about washing the yarn yet again and weakening it, but I was totally delighted to see the grayish discoloration was gone and the yarn didn’t seem any the worse for the extra washing! Suddenly, this Butterfly cotton yarn from Greece was my favorite! And when I next visited the Needler’s Nest, they had several shades of pinks and purples on sale at 50% off, so I bought up all the single skeins on sale and am currently making a bedspread of circular medallions using the various shades. |
|
|
With the little triumph of a clean skirt, I decided to keep crocheting and not give up on the dress. The skirt was worked in the round until it was knee-level, when the pattern suggested putting in a back slit. I then worked the pattern in rows to create the slit. With the skirt worked directly off the bodice, the weight of the dress grew as the dress’ length grew. Keeping this in mind, along with the height of the shoes I’ll be wearing, I stopped crocheting the skirt when it was still a few inches off the ground. But here’s what I should have done, and where you can learn (again) from my experience. I should have been more scientific about determining the exact rate of “growth” of the dress by creating a swatch of the scalloped rows and adding the necessary weight to it, to know precisely how much the skirt would grow per row. Now, I have to be prepared to wear higher heels in case of additional growth!! Or hope that the final washing of the dress, when I steam all seams and crocheted fabric into place, will help draw-up the fabric a bit. Not only does the skirt “grow” from the weight of additional rows, but the bodice also stretches slightly when the dress is worn, so I’m considering adding a cotton lining to the bodice, mainly as a way to strengthen the straps and keep them from stretching under the weight of the dress. Building this dress feels like being an engineer, which is fun because I get to think about crocheting and clothing construction in ways I’ve never considered before. Assembling this dress by hand has made me much more appreciative of clothing in general and the art of sewing functional clothing in particular. In the 60s and 70s, my Grandmother Bohannon and my mother made most of my childhood clothes. My grandmother also sewed clothes for people in her small town of Hazelhurst, Georgia. I can remember friends and neighbors stopping by Grandma’s house for fittings and how she would lay butter knives on pattern pieces, instead of pinning them to the fabric, to save time when cutting out pieces. My Mom would come outside and call me over from playing to see how a pair of shorts was fitting me and then I’d go back to playing while she went inside to finish the shorts set. Women from all cultures across time have seemed to be the keepers of textiles. It’s in our blood, this urge to work fibers with needles and threads, and following those impulses brings us treasures to share. I’m truly grateful to my Mother and Grandmother for exposing me to sewing and crocheting, even when I wasn’t paying close attention! |
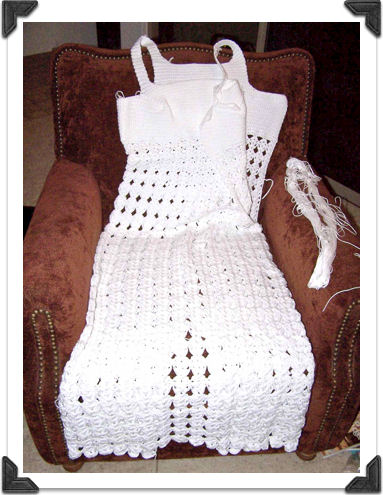 Dress with raw edges in early phase |
|
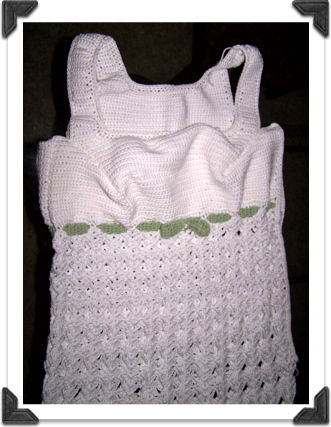 Dress before seed pearls are added to neck and armholes, before the satin lining is inserted, and with the side zipper |
Here’s another tip I learned from my Grandmother, which you might find useful when working on long-term projects that require lots of handling: Wash your hands each time before picking up the projects, and keep the project covered to keep it safe from dust or other dirty hands. I keep my dress next to the chair where I work on it, and I keep it covered by a pillowcase. If there will be time between my work dates, then I tuck the dress and bolero jacket safely into the pillowcase, to prevent the kitty cat from walking on it or trying to eat the seed pearls off it! The dress is an easy pattern. Once worked completely, time was spent weaving in all the yarn ends and single crocheting the edging around the neckline and armholes. I also worked an edge of single crochet on the skirt’s back slit for a more polished look, and on the side opening of the dress to have a stronger platform for sewing in the 18-inch zipper. Also, once the bodice was complete, I crocheted a small ribbon of green yarn into a belt, and wove the belt in and out of the openings at the bodice’s lower edge. The pattern called for making a bow at the front of the dress with the ribbon belt, so I tacked the “belt” into place with a ribbon at the front. Once the belted ribbon of green was in place, I sewed seed pearls in graduating sizes into each scallop of the top three rows. I also beaded the neckline and armholes with three rows of seed pearls, which took quite a few hours. The last scalloped row of the skirt looked a little plain, so I sewed round and elongated pearls into each scallop, to catch the light and accentuate the curve of the scallop. As I sewed seed pearls onto the dress, I’d sometimes alternate working on the bolero jacket, which required three pieces for the body and two pieces for the sleeves. I carefully measured the pieces against my body to ensure correct sizing. Because the number of rows and stitches I used weren’t exact to the pattern (I custom made them fit my shape), I used the same number of rows and stitches for each mirror piece. This simply means I worked the left and right front pieces and sleeves exactly alike so they would match when paired. Setting in the sleeves was made less complicated because I have set sleeves in clothing projects. Once all the bolero pieces were assembled, I crocheted the same scallop row design on the sleeves and the jacket body that appears in the skirt of the dress. The jacket is mostly solid fabric made from single crochet rows, so I toyed with the idea of putting a green ribbon through the bolero jacket’s first row of scallops. I decided against it for fear of adding too much color, and because the rows of scallops add some delicacy. |
|
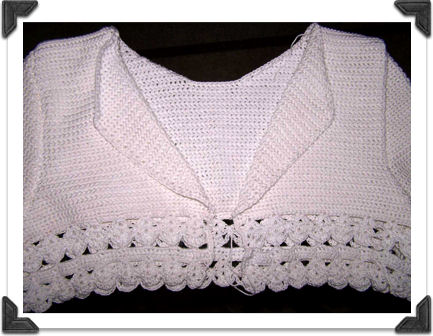
| In the 1970s dress pattern, the bolero jacket opening is worn in the back, but wearing the jacket like that did not look good on me or with the dress, so I turned the jacket around and tacked the neckline down to create lapels, which looked much better with the dress’ neckline. Once the lapels were tacked down, I began sewing two rows of seed pearls around the neckline, both the front and the back, to emulate the pearls sewn onto the dress. I’m searching for the perfect button to put in the front, to hold the jacket together. Although the pattern doesn’t call for a button, it will make the jacket easier to wear and appear much neater.
I still haven’t decided if I’ll wear the bolero during the ceremony, or just during the reception. It’s nice to have options. I tested a shawl pattern in tiny, cotton thread to see how it would look as a veil, but it was much too cumbersome. So I placed the lacy shawl over my shoulders and am considering wearing it instead of the bolero jacket, or perhaps will switch between the shawl and bolero jacket. Right now, neither of them is finished off as I envision them, with seed pearls dripping from the shawls bottom edge, and a cotton lining on the bolero. |
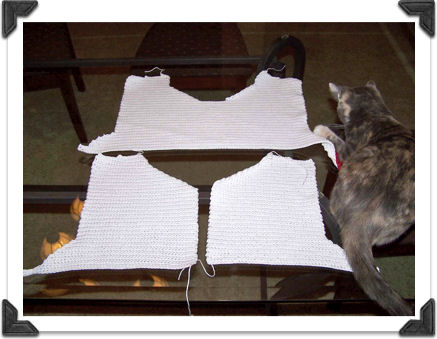 Miss Scottie, our kitty cat, helping me display the bolero jacket pieces before they were assembled |
|
 Unfinished bolero jacket, showing lapels and ready for seed pearls around neckline (to mimic the dresses seed pearl patterns) |
Before this article goes to “print,” I’ve made it a priority to sew in the satin skirt lining and the side zipper. Creating the lining meant measuring the dress skirt and my hips to create pattern pieces, which I drew onto large sheets of craft paper. Our sewing machine wasn’t working, so I sewed the lining pieces together by hand, leaving a slit up the back. Every single crochet stitch, beaded stitch and sewn stitch has been by hand, which makes me very proud. I also created a casing at the top of the lining, which allowed me to insert a piece of elastic around the empire waist, another device to assist in keeping the dress from sliding downward from the weight of the skirt.
Because I want the dress to have a “finished” appearance (even underneath), I covered raw seam edges with white seam binding, and covered all seams with hemming lace. I also plan to crochet a lace trim for the lining’s bottom hem, and to use the same scallop pattern from the skirt in the tiny trim. When the satin lining hem peeks out from under the skirt’s edge, you’ll see the pretty crocheted lace trim. The dress will (hopefully) change a great deal from the final pictures included with this article, especially after adding cotton linings, more seed pearls, and other little touches of whimsy. Perhaps Darlisa will be kind enough to run photos from the wedding showing the final dress/bolero jacket/shawl, and shoes! (From the editor: Absolutely! Look for wedding photos in a future issue, perhaps the Winter one?) |
|
| Dress labels are another finishing touch to be added. Mary Cobb on Etsy.com embroidered two white, oval-shaped cotton labels with our initials and wedding date; one for the dress and one for the bolero jacket. Mary matched the green embroidery thread with our wedding green (she also handmade a cotton handkerchief for Brent and embroidered it with the same information). Once I’ve determined if cotton linings for the dress bodice and bolero jacket are necessary, I’ll sew in the labels.
I loved producing this dress, and putting a lot of thought into making it special, by adding our wedding green in the belt, adding a special button to the bolero and asking Mary to create the custom dress labels. However, there were times when I was downright scared about the final outcome. Sometimes I would panic, like when the bodice was a little loose and I had to take in the right side seam. Deciding to take in that seam took me a few days of contemplating the project and getting over the feeling of failure. I had to stop feeling like I had already failed before I could see a solution. And then I had to give myself permission to use my solution, even though it would be imperfect, because the inside seam would now be a bit more bulky and slightly out of place. But the seam would still be under my arm and not really noticeable! |
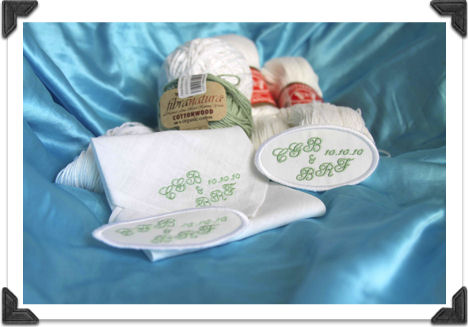 Mary Cobb embroidered the oval cotton labels for the dress and the bolero jacket, and handmade and embroidered the matching handkerchief for the groom |
|
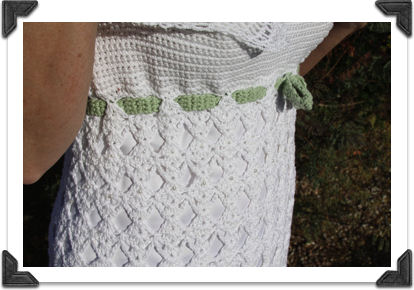 Me modeling the dress after satin lining added to skirt Eventually, the green belt will be trimmed in tiny seed pearls |
The courage it took to overcome flaws, or what I saw as mistakes, during the making of this dress came from knowing I had allowed enough time for the entire project, and also from Lily Chin, who tells her readers to “embrace your mistakes.” We crocheters are so hard on ourselves as we strive for perfection. Don’t point out your mistakes, the ones no one else can see; be kind to yourself.”
Even after Brent took photos of the dress for this article (which aren’t final photos because I plan to add many more finishing touches), I looked at the photos and became very depressed. The dress doesn’t look sensational in the photos, although it is a lovely dress. This was one of those times when I panicked and worried the dress wasn’t good enough. I’ll follow my plan, though, which calls for taking a few days to consider what seems “off” about the dress and to determine how I might overcome the “flaw.” I’m taking take Lily Chin’s advice and am kind to myself, and celebrate this craft, which brings me such joy. I hope you’ll be kind to yourself, too, and remember how much joy your handmade items bring to family and friends. “Handmade” isn’t as common as it once was, which makes it more precious. So embrace those mistakes and keep on crocheting!! I promise I will, too! |
|
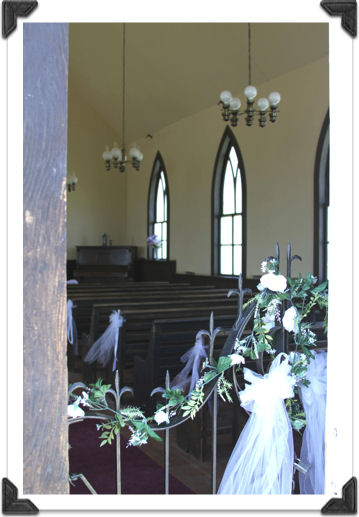 Interior of 1880’s church at the Pioneer Living History Museum where Brent and I will wed |
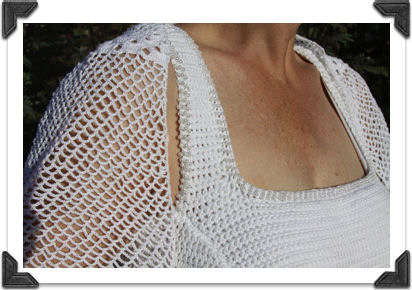 Neckline and armholes show seed pearls, and the delicate shawl covers my shoulders |
|
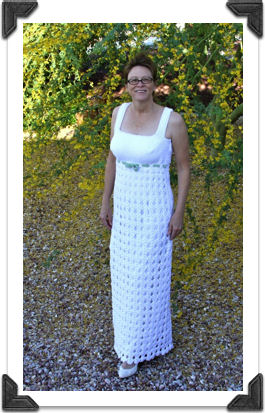 I didn’t apply make-up or fix my hair, so I apologize for my appearance in this shot. This is the dress with satin skirt lining and zipper installed. You can see the importance of strengthening the strap against stretching downward, AND having a good bra as a foundation, which isn’t the case in this photo. I will definitely find an appropriately supportive bra before 10/10/10. |
 Dress with satin lining and zipper installed, but more “finishing” work to be done before the Big Day |
|
| Article and photos © Cindi Brown aka Fists of Fury | ||