| I’m hoping that by showing how I did this, you’ll be able to do the same thing yourself, either like I did for the pillow or as a starting point for a different type of project (rectangle, in the round, etc.) with either one or multiple rows of the stitch. The hardest part to figure out is the corners but it’s a lot easier than it looks!
To make it easier on yourself, especially if you’re going to do a lot of designing, I highly recommend you purchase the Crochet Charts software made by Stitch Works Software. You’ll be glad you did. Download PDF version of this tutorial. |
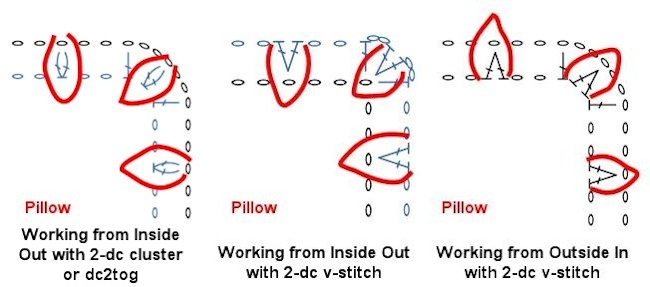
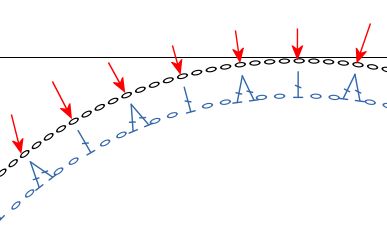
| For the corner of the edging, I knew that the dc v-stitch for the base mesh would have to be in the corner with a single dc on each side. Since each crocodile repeat requires six stitches, I needed to make sure I found a hook that allowed me to get a multiple of six stitches across each side of the pillow (6.5″ per side). I also realized that the point of the v-stitch had to be on the outside so the point of the crocodile stitch would match it. If I started with the base chain at the edge of the pillow then made the base mesh, the point of the v-stitch would be pointing towards the center of the pillow instead of out from the pillow. This meant that I either had to work from the outside in or make a 2-dc cluster or dc2tog. If I used a 2-dc cluster or dc2tog, then I was afraid that the wider edge of the crocodile stitch would end up too pointed since both ends of the cluster would be at a point. Based on this, I decided to work from the outside in although I actually designed it started at the inside edge since I knew the stitch count needed around the inside edge already. |
 |
| I’d chosen a size 10 crochet thread with a recommended hook size of 7 / 1.5 mm. After looking at the hook and comparing it to the thread, I couldn’t see how the thread fit the hook. The thread was just too big for the recommended hook size. I ended up choosing two hooks to try out, a 1 / 2.75 mm and a 2 / 2.25 mm (Boye brand). I began making my chain with the size 1 hook and after about 30 chains (a multiple of six, of course), I laid the chain next to my ruler to check the length. I then added twelve more chains, checked the length again, and realized that another six chains would make the side too long. I undid the chain and started over with the size 2 hook and this time it worked out perfectly with 48 chains equaling 6.5″. Since the corner stitch had to be a v-stitch and the stitch on either side had to be a dc, I knew I needed one more ch for the last dc for a total of 49 sts per side or 196 chs. Now I just needed to figure out how many chs to add for the outside of each corner. |
| Use this same method to find out how many chs you need for the inside edging when your piece is larger or smaller or even if it’s a rectangle. Split the measurement of each side into smaller chunks, then increase the count as needed. For example, if one side is 10″, make a base ch that is 5″ long in multiples of 6. Once you have the stitch count for the 5″, double it to get the stitch count for 10″. The same goes for a round piece, but then figuring out the outer edge is a bit trickier so I’ll cover that later. |
| In the Crochet Charts program, I started a new chart a Chart Style of Rows, Rows set to 2, Row Spacing of 3 Chains, Stitches set to 49, Default Stitch of ch, and entered a title in the Chart Title field, then clicked on OK: |
 |
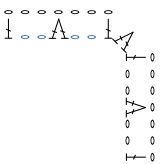
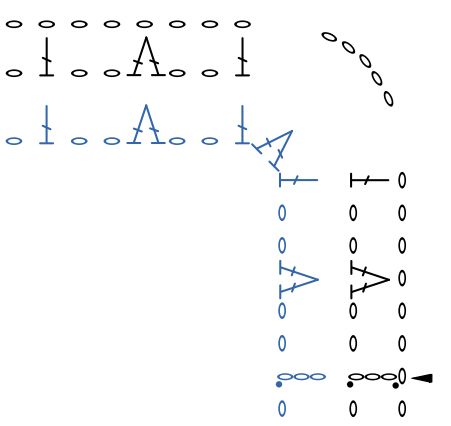
| Since the corner stitch will be a v-stitch, the stitch on each side of the corner will need to be a double crochet (dc) with every other stitch being the v-stitch. I replaced the first chain on the top row and every sixth ch with a dc: |
 |
| Next, I replaced the middle ch between each dc with a v-stitch: |
 |
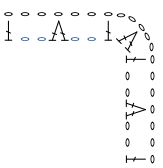
| Okay, looks good but the v-stitches are pointing into the pillow instead of out towards the edge. No problem, just select all the stitches, group them, then rotate them 180 degrees: |
 |
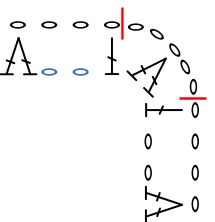
| Now I needed to make the corner so I copied the grouped stitches, pasted, then rotated it until it was in the correct orientation and moved it into place: |
 |
| Next, I added a v-stitch in the corner: |
 |
| Then added the ch in the center for the v-stitch to go into and finally added two more chs in between to round out the corner: |
 |
| You can add more than one ch in between if you think the corner will be too tight. Since you won’t work into the extra chains, they’ll just be there to keep the corner from being too tight and possibly bending in more than you might want them to. |
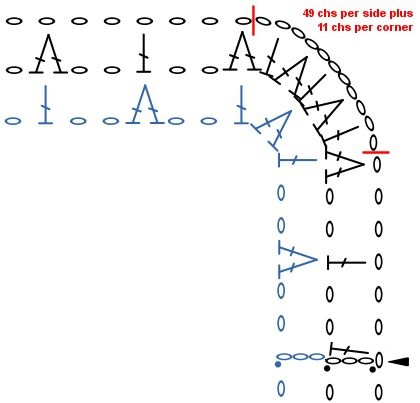
| Looking at the completed corner, the chs above the dcs are part of the original 49 chs for each side so each corner needs 5 chs added, so 5*4=20 plus the original ch count of 196 equals a total base ch of 216. |
 |
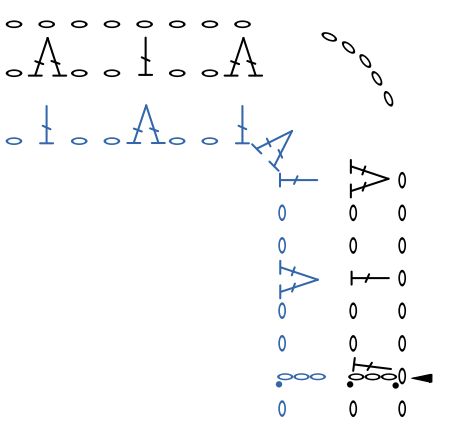
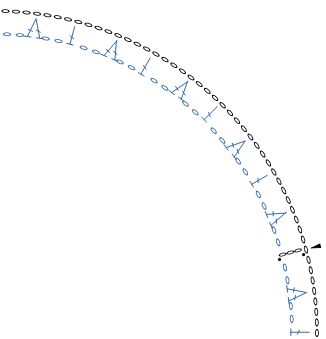
| To finish off the other sides and corners, I just copied the original side twice more, rotated each one and placed them along the correct side. Next, I selected the corner sts, grouped, copied, pasted, rotated, and moved them into place. I then selected all the stitches and ungrouped them. |
| Now that I had all the sides and corners set up, I needed to decide where to start working. I realized that I didn’t want to start right on a corner as, knowing myself like I do, I’d be sure to mess it up. As a result, I decided to start at the dc just before one corner. I replaced the dc with a ch-3, added the slip stitches, and then the starting arrow. |
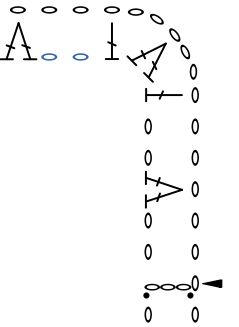 |
| All that was left was to set up the rows in the program so they showed up in different colors (black is round 1, blue is round 2). Note: the rounds showed up as rows in the program since I started with rows instead of rounds. Since the program does rounds only in circles, I had to use rows in order to get the straight edges I needed. No biggie, I can handle this! |
 |
| When I worked the piece, once I’d made the two rounds, I was able to add the crocodile stitches around the v-stitches of round 2. You can add the crocodile stitches to your chart if you want, but if it’s just for your use, it may not be needed. If the chart will be sold or provided free to other crocheters, either add them to the same chart or provide a second chart with the crocodile stitches added. It might avoid confusion because of the way the stitches are made on top of round 2. That way, the stitcher can make the base ch and mesh without being distracted by the stitches laid over them. Just a suggestion. You might also just want to provide one corner of the chart so it’s not too large and just provide written instructions on how to proceed. |
| Okay, but what if you want two rounds of crocodile stitches? … You do realize you’re a glutton for punishment, right? (sigh) |
| Well, if you insist … Save your original chart and then save it again under a new name (File > Save As). That way, if you mess up beyond repair there will be a back up file to go back to. |
| Copy just the top and right sides of the chart and move them up and to the right as shown below. I’ve found that it’s easiest to select the stitches, group them, then copy and paste. Just make sure you move the stitches that are all black and not the stitches with the one blue and one black row. Don’t copy the corner yet. Ungroup all the stitches. |
 |
| You won’t need the stitches from the original base ch (round 1) so delete all the chs from round 1 except for the corner. Just select the chains and move them out some so you don’t have to start from scratch on the new round 1. Make sure you also delete the original starting arrow and sl st. |
 |
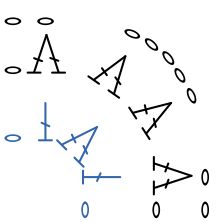
| Since the crocodile stitches alternate on this round, replace the dcs with v-stitches and the v-stitches with dcs. For the beginning dc, just add a dc next to it and rotate it slightly. |
 |
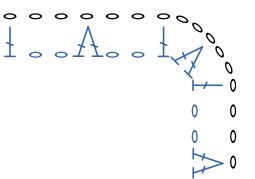
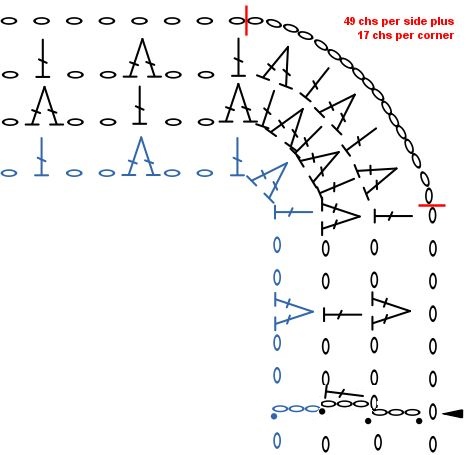
| Now to add the corner v-stitches. We’ll need a crocodile stitch on either side of the original one so add them as shown below: |
 |
| Add dcs in between the v-stitches: |
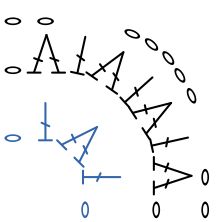 |
| Add a ch at the base of the new dcs then add a ch between each existing ch on the corner. You can also move the stitches closer to the original round 2 at the same time. You can now group, copy, and paste the sides and corners around the rest of the piece. Set up the rows/rounds with the outside round being row/round 1 (the chart below hasn’t had this done to it yet). Save the chart. |
 |
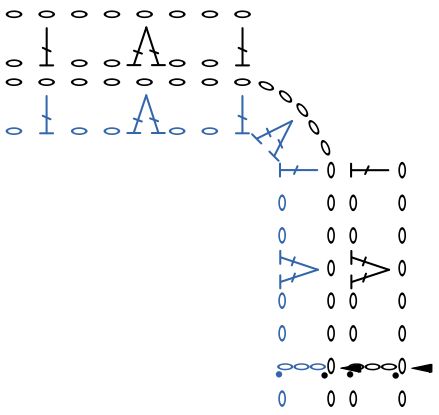
| Don’t even ask me about three rounds … I’m not gonna help you there … at least not much: |
 |
| Now for a round edging … since there aren’t corners on a round piece (of course), we don’t have to worry about an extra ch at the end like we do for corners and it’s a lot easier to figure out than a square. |
| Let’s say you have a round pillow that is 19.5″ in circumference. I’m using this since I already know I need 48 sts for 6.5″ and 6.5*3=19.5 so 48*3=144. Now to determine the number of repeats – 144/6=24. That means that the first mesh round will have 24 v-stitches and 24 dcs separated by two chs. If we assume that the base ch will need 3 chs instead of 2 in between the chs where the dcs and v-stitches are added, then we know we’ll need a base ch of 192 chs – 1 dc + 3 chs + 1 v-stitch + 3 chs =8 sts * 24 reps. |
| If you want to chart this out using Crochet Charts, then you’ll have to do a bit of finagling as the program assumes that charts in the round start in the center and not at the outer edge. You can also only increase by a set amount for each round so you can increase rounds to 144 sts but if you increase the same amount to the next round (base ch), it won’t equal 192 sts. |
| To get a good round in Crochet Charts with sufficient spacing between the sts, we’ll need to create a chart with 12 rounds that increases by 12 on each round, then delete the rounds we don’t need. |
| Create a new chart with the following settings: Chart Style = Rounds, Rounds = 12, Row Spacing = 3 Chains, Starting Stitches = 12, Default Stitch = ch, Increase by 12. Add a Chart Title and click on the OK button. |
 |
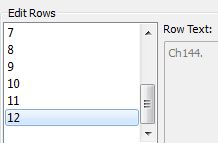
| Save the file so you can use it as a backup if needed, then save it again under a new name (File > Save As). Next, delete rounds 1 through 11 leaving the largest round intact. Save. Note: You can check the number of sts for the round you’re keeping by going into Row Edit mode and selecting row 12. It should show “Ch144.” |
 |
| Starting with any ch in the round, convert every sixth ch to a dc then the ch in the middle of each dc change to a v-stitch. |
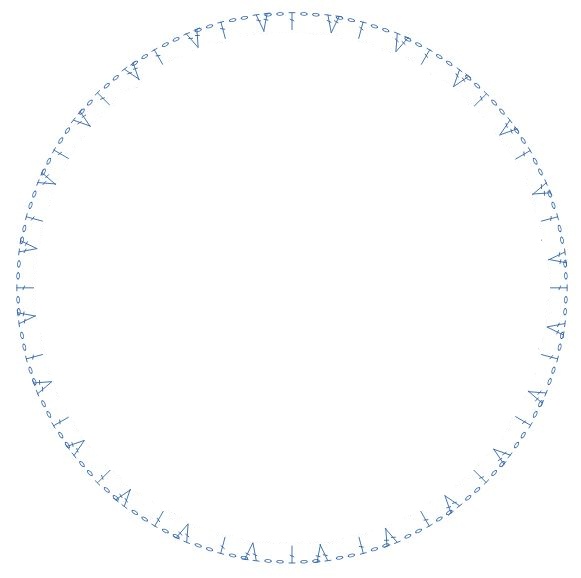 |
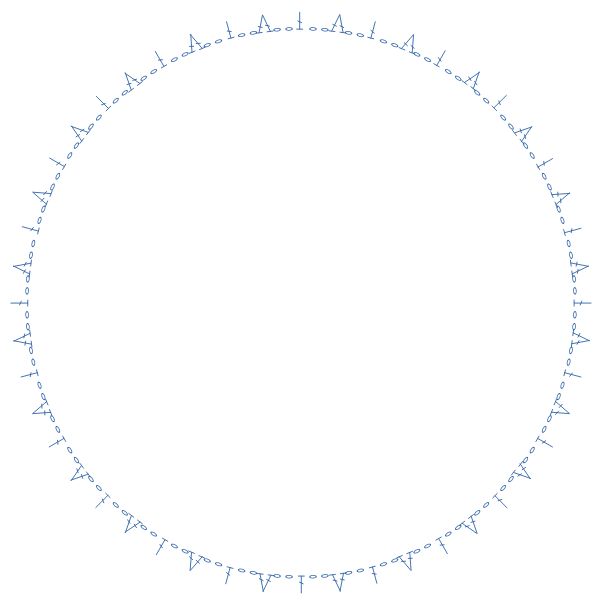
| Select each dc and v-stitch and rotate it 180 degrees then move it back into place. Make sure you select the current stitch in the Pattern Stitches panel before selecting the matching stitch on the pattern. If you don’t, when you click on a v-stitch and you have the dc stitch selected, the v-stitch will be converted to a dc and you’ll need to undo the change. Once you’ve completed this, you can check the instructions in Edit Row mode to see that you have 24 repeats. Save. |
 |
Now you need to figure out how to get the base ch round of 192 sts. If we had made our current chart with 13 rounds then round 13 would only have had 156 sts, i.e., 144 + the 12 increase on each round. We know we have 24 repeats and each repeat will need to be 8 sts so we need to figure out what the beginning stitch count should be and how many increases on each round should be made. The increases also have to be made up to 13 rounds since our base mesh round was originally round 12 and we need it to be larger. So, divide 192 by 13 rounds to get 14.769, which means we need to increase each round by 14. To find our beginning round, we multiply 14 by 12 rounds to be increased over, which equals 168, then subtract 168 from 192 to get your starting ch of 24.
- Base chain = 192
- Base chain is round 13
- 192 / 13 = 14.769 for an increase of 14 over rounds 2 – 13
- Increase of 14 over 12 rounds = 168
- 192 – 168 = 24 sts for beginning count on round 1
|
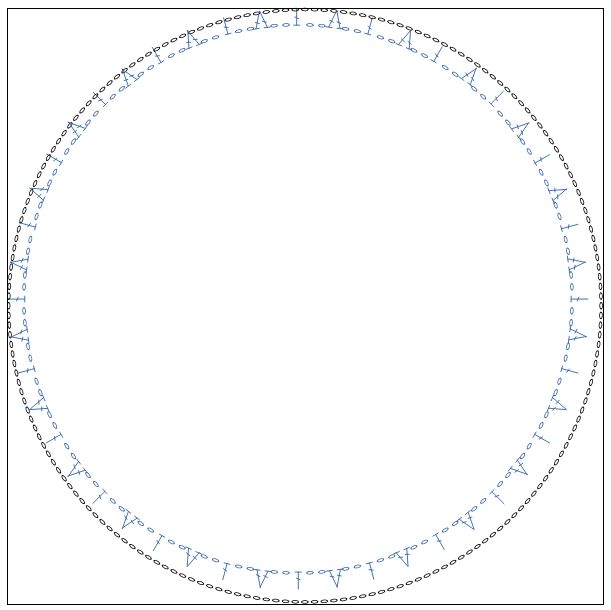
| So, create a new chart with the following settings: Chart Style = Rounds, Rounds = 13, Row Spacing = 3 Chains, Starting Stitches = 24, Default Stitch = ch, Increase by 14. Click on the OK button. You don’t need to give the chart a title as you won’t be saving it. Go into the Row Edit mode, select round 13 and check to make sure it has 192 sts. Delete rounds 1 through 12 then select all the remaining stitches, group them, and copy. |
| Now, go back to your saved chart and paste. The copied round will be added to the chart. It may be a bit off but since you grouped it before copying, you can easily line it up around the original part of your chart. |
 |
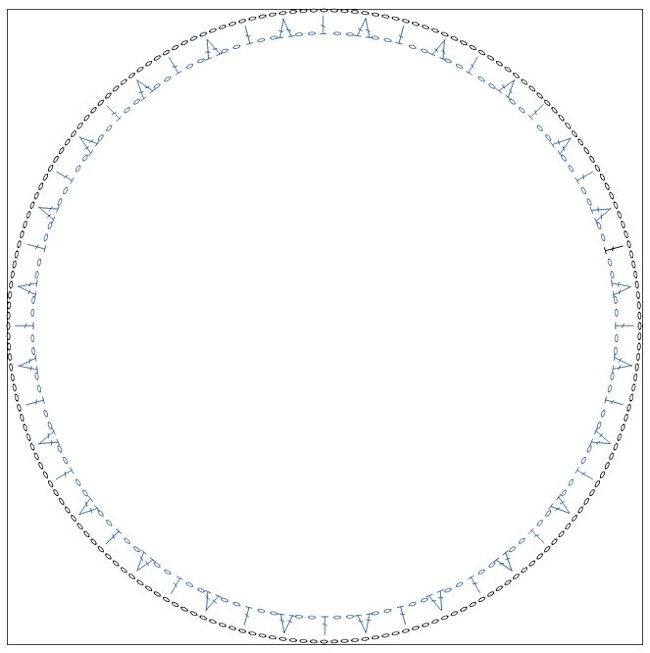 |
| Check to make sure that each dc and v-stitch line up with a ch on the outer round. If we’ve done our calculations right, they should match up perfectly. |
 |
| You can now discard the chart you created to get the base ch round and set up your beg dc and sl st joins on your chart. If you’re only going to provide a section of the chart, make sure you make your beg dc in the section you’ll be providing. Oh, and ungroup the base ch round first. Save then set up your rounds/rows in Edit Rows to add the sl sts to each round. Save. |
 |
| I hope this has been useful to you and allows you to add a crocodile stitch edging to some of your projects. |
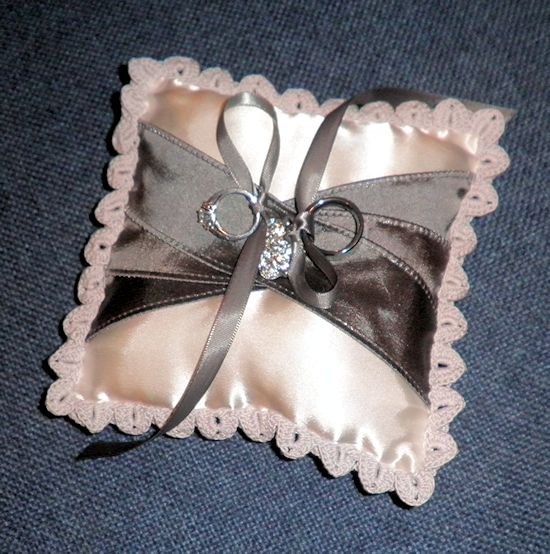
| Final Notes: For the pillow, I cut four 7″ squares of the fabric, two of the satin and two of a plain cotton for backing. I placed a satin sqare right side up on top of a cotton square then pinned the ribbons to it so they looked sort of like they were folded and fanned out. Next, I sewed down the ribbon edges and around the rest of the piece to hold the two fabric pieces together. I then basted the bottom pieces together. Next, I placed the top and bottom pieces right sides facing and sewed them together leaving a 1″ hole for turning. After trimming the corners, I turned it right side out and stuffed it with poly fil (not too much, you don’t want it too hard). Now came the more difficult part of adding the lace. To make it easier, I used a zipper foot and sewed a top stitch all around the edge of the pillow, making sure the opening edges were tucked in. I carefully placed the straight edge of the lace over the top stitching and pinned it down. Finally, with the zipper foot still attached, I top stitched the lace to the pillow. Finally, I added a fancy button and a length of ribbon to the top with a small button on the bottom and stitched them down all the way through the pillow. |
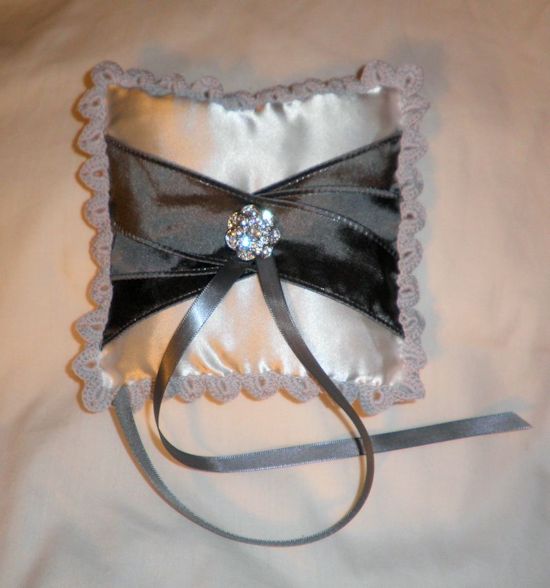 |
| Pattern and photos © Darlisa Riggs, CatBird Studios |