|

|
Sizes and Materials List …
|
|
| Size: |
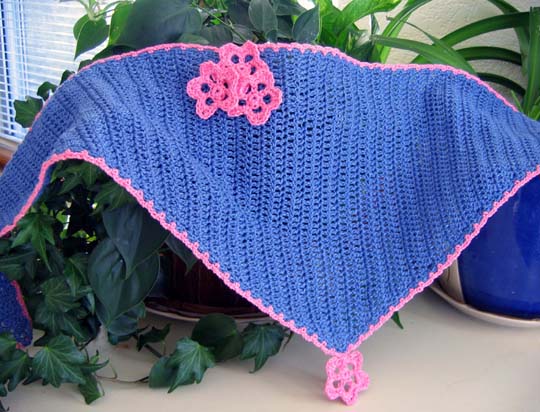
One size, to fit average adult (approx. 34” wide at top by 10” deep at center back point) |
| Hook(s): |
US E/4 (3.50 mm) or size needed to obtain gauge. |
| Yarn: |
Lightweight cotton/nylon blend yarn or similar weight cotton-blend yarn that works to gauge Sample shown in Bernat Cool Crochet [70% cotton, 30% nylon (200 yds/182 m per 50 g/1.75 oz ball] |
| Colors & Approx. Yardage: |
Denim (blue) – main color (MC): 225 yds |
|
Notions: |
Yarn Needle |
| Gauge: | 20 dc and 12 rows = 4”/10 cm in dc Always take time to check your gauge |
|
|
|
|
Notes …
|
|
| Pattern Notes |
Scarf is worked back and forth in rows from side point to side point. Triangle shaping is achieved by maintaining increases/decreases along one edge with other edge remaining even (straight). Place contrast thread marker along increase/decrease edge as a guide to keeping increases/decreases at same side throughout scarf. |
| Stitches Used |
Chain (ch) |
| Abbreviations | beginning (beg) each (ea) established (est) hook (hk) loop (lp) pattern (patt) repeat (rep) skip (sk) space (sp) stitch (st) |
|
Instructions …
|
|
| Scarf | |
| Row 1 |
With MC, ch 4, work 2 dc in 4th ch from hk (3 dc). Mark as right side. |
|
Row 2 |
Ch 3, turn, dc in first dc (at base of beg ch-3), dc in next dc, dc in top of turning ch. (4 dc) |
| Row 3 |
Ch 3, turn, dc in ea of next 2 dc, work 2 dc in top of turning ch. (5 dc) |
| Row 4 | Ch 3, turn, dc in first dc (at base of beg ch-3), dc in ea of next 3 dc, dc in top of turning ch. (6 dc) |
| Row 5 | Ch 3, turn, dc in ea dc across, work 2 dc in top of turning ch. (7 dc) |
| Row 6 | Ch 3, turn, dc in first dc (at base of turning ch), dc in ea dc across, dc in top of turning ch (8 dc) |
| Rows 7-47 | Rep rows 5 and 6 alternately, maintaining pattern as est (one st increased every row). At end of row 47 – (49 dc) |
| Row 48 | Ch 3, turn, dc in ea dc across. (49 dc) |
| Row 49 |
Begin decreases: Ch 3, turn, dc in ea dc across to last 3 sts (the last 2 dc & the turning ch), dc2tog, dc in top of turning ch. (48 dc) |
| Row 50 | Ch 3, turn, dc2tog (skip the dc at base of turning ch & dc the next 2 dc tog), dc in ea dc across, dc in top of turning ch. (47 dc) |
| Rows 51-94 | Rep rows 49 and 50 alternately, maintaining pattern as est (one st decreased every row). At end of Row 94 – (3 dc) |
| Row 95 | Ch 3, turn, dc2tog. Do not cut yarn, do not turn. |
| Edging | |
| Round 1 |
Continuing with MC and with right side (front side) of piece facing, ch 1, then sc around entire piece with somewhat loose tension so that work lies flat, working 2 sc in end of ea row and 3 sc at ea point of triangle. Join with sl st and fasten off MC. |
| Round 2 | With right side (front side) of piece facing, attach CC at center back point on triangle, ch 1, sc in same sc, *ch 3, sk next sc, sc in next sc,* rep from * to * around entire scarf, join with sl st to beg sc. Fasten off and weave in ends. |
 |
|
| Flowers (make 4) | |
| Round 1 |
With CC, ch 4, join into ring, ch 1, work 5 sc in ring, join with sl st. (5 sc) |
| Round 2 | *Ch 5, sc in next sc,* rep from * to * four times, ending last rep ch 5, join with sl st to sc at base of beg ch-5. (5 ch-5 lps) |
| Round 3 | *In next ch-5 lp work (sc, hdc, dc, ch 2, dc, hdc, sc),* rep from * to * around, join with sl st to beg sc. Cut yarn, leaving 12” tail for sewing and fasten off. |
| Finishing … |
|
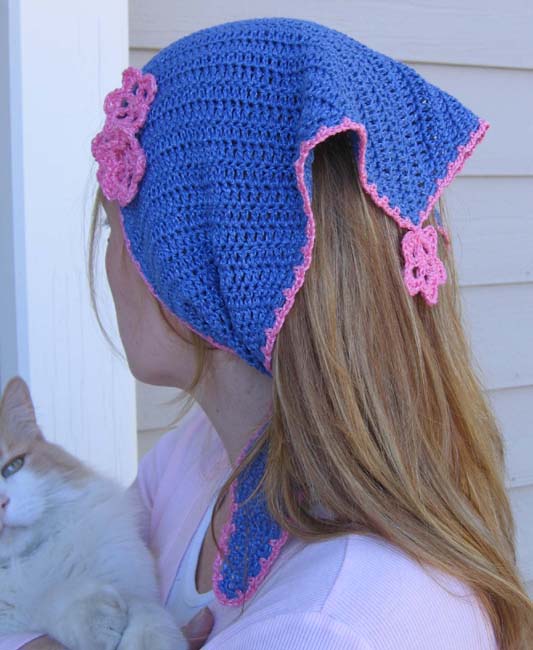
| Arrange 3 flowers and sew to front of scarf approximately 8 rows to left of center as shown. Attach 4th flower so it hangs from center back point. Finish off and weave in all ends. | |
|
|
|
| Pattern and photos © Kathy North, Designs by KN Modeled by Cecily North (& Andrew-cat) |
|