|

|
Sizes and Materials List …
|
|
| Size: |
8” tall x 17” long |
| Hook(s): |
US D/3 (3.00 mm) or size needed to obtain gauge |
| Yarn: |
(A) KnitPicks Palette [100% wool, 231 yds/50 g ball] |
| Colors & Approx. Yardage: |
(A) 350 yards of any fingering weight wool blend. |
|
Notions: |
Yarn Needle |
| Gauge: | After blocking:
Always take time to check your gauge |
|
|
|
|
Notes …
|
|
| Stitches Used |
Chain (ch) |
| Abbreviations | Stitch(es) (st / sts) Back Loop Only (blo) |
| Special Stitches | Pattern Stitch #1
*hdc, dc, dc, trc, trc, dc, dc, hdc* (8 sts) Pattern Stitch #2 *trc, dc, dc, hdc, hdc, dc, dc, trc* (8 sts) Single Crochet 2 Together (sc2tog) Insert hook in first st, yo, pull through, two loops on hook, insert hook in next st, yo, pull through, three loops on hook, yo, pull through all three loops on hook. Half Double Crochet 2 Together (hdc2tog) Yo, insert hook in first st, yo, pull through, three loops on hook, yo, insert hook in next st, yo, pull through, five loops on hook, yo, pull through all five loops on hook. |
|
Instructions …
|
|
| Body Part 1 | |
| Base Chain |
With A (optional: C1) and smaller hook, ch 105. |
|
Row 1 |
Hdc in 2nd ch from hook and in each ch across. (104 sts) |
| Row 2 |
Ch 3, turn, trc in first hdc and in ea hdc across. |
| Row 3 | Ch 2, turn, dc in first trc and in ea trc across. |
| Row 4 | Ch 1, turn, hdc in first dc and in ea dc across. |
| Row 5 | Repeat row 4. |
| Row 6 | Ch 1, turn, work stitch pattern #1 across. |
| Rows 7-8 | Repeat row 4. |
| Row 9 | Ch 3, turn, work stitch pattern #2 across. |
| Rows 10-11 | Repeat row 4. |
| Row 12 | Ch 1, turn, work stitch pattern #1 twice, hdc across to 16 sts before end and work two more repeats of stitch pattern #1. |
| Row 13 | Ch 1, turn, hdc in first 16 sts, work stitch pattern #1 nine times, then hdc in last 16 sts. |
| Rows 14-15 | Repeat row 4. |
| Row 16 | Ch 3, turn, work stitch pattern #2 twice, trc in next 3 sts, *dc, dc, hdc,* repeat from * to * across to 19 sts before end, dc, dc, trc, work stitch pattern #2 twice. |
| Row 17 | Ch 1, turn, hdc in first 20 sts, work stitch pattern #1 eight times, hdc in last 20 sts. |
| Rows 18-22 | Repeat row 4. |
| Rows 23-35 | Work rows 5 – 17 again but in reverse order, i.e., work row 17, then 16, then 15, and so on, ending with row 5. Fasten off. |
| Body Part 2 | |
| Base Chain |
With B and larger hook, ch 51. |
| Row 1 |
Hdc in 2nd ch from hook and in each ch across. (50 sts) |
| Row 2 |
Ch 1, turn, hdc in each hdc across. |
| Row 3 |
Ch 1, turn, hdc in first 2 sts, hdc in blo of next 46 hdc, hdc in both loops of last 2 sts. |
| Rows 4-17 | Repeat rows 2 and 3 (row 2 in ea even row, row 3 in ea odd row).. |
| Rows 18-20 | Repeat row 2. Fasten off. |
| Shell Border | |
| Row 1 |
With smaller hook, join A (optional: C2) with a sl st to first hdc of Body Part 2, *hdc in first st, 2 hdc in next st,* repeat from * to * across. (75 sts) |
| Row 2 | Ch 1, turn, sc2tog, *skip next 2 hdc, 6 trc in next hdc, skip 2 sts, sc in next hdc,* repeat from * to * across to last 2 hdc, sc2tog. Fasten off. |
| Pocket Part 1 | |
| Base Chain | With B and larger hook, ch 19. |
| Row 1 | Hdc in 2nd ch from hook and in ea ch across. (18 sts) |
| Rows 2-16 | Ch 1, turn, hdc in ea hdc across. Fasten off after completing row 16. |
| Pocket Part 2 | |
| Base Chain | With A (optional: B) and smaller hook, ch 29. |
| Row 1 | Hdc in 2nd ch from hook and in ea ch across. (28 sts) |
| Row 2 | Ch 2, turn, dc in ea hdc across. |
| Row 3 | Ch 3, turn, trc in ea dc across. |
| Row 4 | Ch 2, turn, dc in ea trc across. |
| Row 5 | Ch 1, turn, hdc in ea dc across. |
| Row 6 | Ch 1, turn, hdc2tog in first 2 sts, hdc across to last 2 sts, hdc2tog. (26 sts) |
| Rows 7-12 | Repeat Row 6, 6x more. Fasten off after completing row 12 (14 sts remaining at end of row 12) |
| Button Flap | |
| Base Chain | With A (optional: C2) and smaller hook, ch 11. |
| Row 1 | Hdc in 2nd chain from hook and in ea ch. (10 sts) |
| Row 2 | Ch 1, turn, hdc in ea hdc across. |
| Row 3 | Ch 2, turn, dc in ea hdc across. |
| Row 4 | Ch 3, turn, trc in ea dc across. |
| Row 5 | Ch 2, turn, dc in ea trc across. |
| Row 6 | Ch 1, turn, hdc in ea dc across. |
| Rows 7-11 | Repeat rows 2 through 6. |
| Row 12 | Ch 1, hdc in first 3 sts, ch 4, skip next 4 sts (for buttonhole), hdc in remaining 3 sts. |
| Row 13 | Ch 1, turn, hdc in first 3 sts, hdc once in each of the 4 chs, hdc in remaining 3 sts. |
| Row 14 | Ch 1, turn, hdc2tog, hdc across to last 2 sts, hdc2tog, ch1 and turn. Repeat 2x (4 stitches at end of Row 16). Fasten off |
| Rows 15-16 | Repeat row 14. Fasten off. (4 sts remaining at end of row 16) |
| Assembly & Finishing … |
|
|
Weave in all ends. Block each piece to the following sizes:
Joining of pieces will be done with A and smaller hook. |
|
| Lay the Body Part 1 out on a flat surface. Place the Body Part 2 on top of Part 1, lining up the top of the worsted portion of Part 2 (the shells can stick out for now) with the top of Part 1. The left edge of both pieces should also line up. Make sure that the loops created by crocheting through the blo are facing up. | |
| Pin the two pieces together along both sides and the bottom of Body part 2. | |
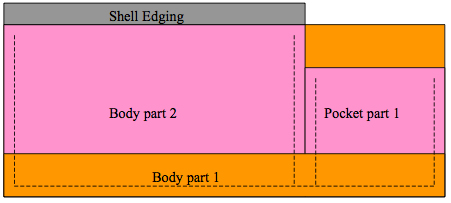
| Now, take the Pocket Part 1 and line up the right side of the piece with the right side of the Body Part 1 and bottom of the Body Part 2. Pin the pocket in the same manner as before.
Please see Illustration 1 below for reference. 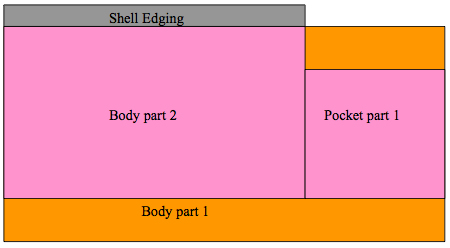 Illustration 1 |
|
| Next, take the bottom portion of Body Part 1 and fold it up as shown in Illustration 2 below. Pin as needed.
|
|
| Now, use a sl st to join the pieces together. (Alternate option: If you are more comfortable sewing the pieces together you may do that using the yarn and a yarn needle.) Sl st the sides and bottom of both Part 2 of the Body and Part 1 of the Pocket as shown by the dotted lines in Illustration 2. | |
| Do not sl st the tops of either piece. The top of the pocket will remain open so it can be used for storing notions. The top of Part 2 of the Body will remain open so that there is a place to store any pattern print outs/handouts. | |
| Next, line up the Pocket Flap (Pocket Part 2) above the Pocket Part 1 so that it is aligned with the top of Body Part 1. | |
| Using hdc crochet through one stitch of the top edge of Body Part 1 and through one stitch on the top edge of Pocket Part 2. After finishing attaching the pocket flap, continue in hdc across entire top edge of Body Part 1. | |
| Continue to add rows to the top, alternating as follows: 1 row dc, 1 row trc, 1 row dc, 1 row hdc, until the main part of the Body is taller than the shell edging by 1-2 rows.
See illustration 3. 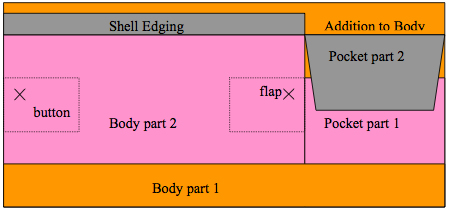 Illustration 3 |
|
|
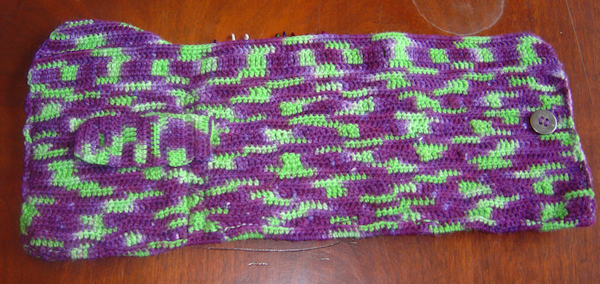
Now to attach the button and flap. Flip the case over so that the outside of the case is facing up. Referring to the photo below, line up the button flap in the center (top to bottom) of the case just inside the right edge as marked by the X in Illustration 3. Sl st it to the outside of the case. Make sure the slip stitching only goes through the flap and Body Part 1.
|
|
| Attach the button to the outside of the case in the spot marked in Illustration 3. | |
| Cut yarn and weave in all ends. | |
| Flip the case over and slide hooks through the loops created by crocheting through the blo. For hook sizes larger than 6mm (depending on your tension) leave one slot on either side empty. The case can be used for sock dpns as well. Anything under 3 mm should be two needles to a slot. | |
|
To close, fold in thirds with the pocket being the first thing folded in. Button up! 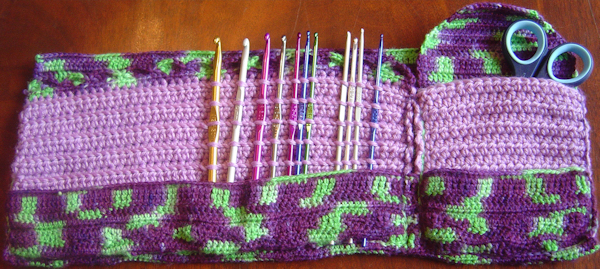
|
|
| Pattern and photos © Tiffany Haworth Photos by Cris Ferguson, Tiffany Haworth, Lori Torrance, and Adrienne Donner |
|