|

|
Sizes and Materials List …
|
|
| Size: | Sample measures 40″x36″ – perfect for a baby blanket |
| Hook(s): | Use recommended hk for selected yarn. Use larger size hk for a lacier version. Sample uses US H/8 (5.00 mm) |
| Yarn: | Yarn Bee Soft Secret [100% Acrylic, 370 yds/6 oz skein] |
| Colors & Approx. Yardage |
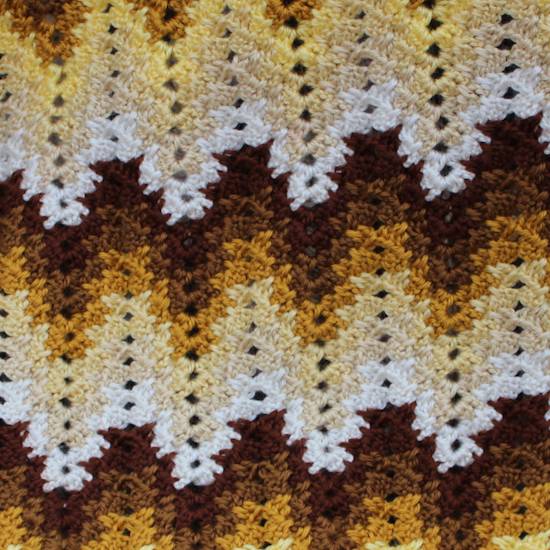
Sample uses: (A) Cocoa/26, 385 yds (B) Cognac/24, 355 yds (C) Honey/22, 355 yds (D) Butter/20, 355 yds (E) Haystack/18, 355 yds (F) Biscuit/16, 355 yds (G) Ivory/14, 355 ydsAh heck … Just buy lots of yarn and no one will get hurt … |
| Notions | Yarn Needle |
| Gauge: | Gauge is not important for this pattern, just be consistent with your tension |
 |
|
|
Notes …
|
|
| Yarn Choice |
|
| Variations |
|
| Determine Starting ch/fsc |
|
| Stitches Used | Chain (ch) Slip Stitch (sl st) Single Crochet (sc) Double Crochet (dc) Foundation Single Crochet (fsc) Reverse Single Crochet (rsc) Spike Stitch (spst) – YouTube Video |
| Abbreviations | Each (ea) Hook (hk) Place Marker (pm) Repeat(s) (rep / reps) Skip (sk) Stitch(es) (st / sts) |
| Special Stitches | Spike Stitch (spst) – YouTube Video The spike stitch is worked into the row that is 2 rows below the row you are adding. I found that if I worked into the top of the center/second dc, the st got pulled up too much and working into the sp between the second and third dc looked and worked better. See symbol chart for placement of spike.Dc into indicated sp, dc loosely between second and third dc on second row below one being made, dc into same sp as first dc.
If your second dc isn’t loose enough for your liking, feel free to replace it with a treble crochet. Reverse Single Crochet (rsc) aka Crab Stitch 1. Ch 1, with the right side of the work facing you, work left to right and insert hk into the front of the next st to the right, yo, pull through, yo, pull through both lps on hk. 2. Insert hk into the front of the next st to the right, yo, pull through, yo, pull through both lps on hk. 3. Rep step 2 until you reach the first rsc, join with sl st. Here’s a video from the Crochet Geek to help you if needed: Crab Stitch Reverse Single Crochet Edging Border. |
|
Instructions …
|
|
| Choose how to start your blanket, with either a base chain or an fsc row and follow the appropriate section below. | |
| Base Chain, Rows 1 & 2 | |
| Base Chain | With color A, ch the number of chs needed for the size blanket you are making. See the Notes section above to determine how many you’ll need. |
| Row 1 | 3 dc in seventh ch from hk (beg dc, ch 2 here and throughout), *[sk 2 ch, 3 dc in next ch] twice, sk 5 ch, [3 dc in next ch, sk 2 ch] 2 times, [3 dc, ch 3, 3 dc] in next ch,* rep from * to * across. |
| Row 2 | Ch 5 (beg dc, ch 2 here and throughout), turn, 3 dc in first ch 3 sp, *[3 dc in next sp] twice, sk next sp, [3 dc in next sp] twice, [3 dc, ch 3, 3 dc] in next ch 3 sp,* rep from * to * across, ending with (3 dc, ch 3, 3dc) in last ch-2 sp. Do not turn. Join color B with as sl st in top of last dc. |
| Foundation Row, Rows 1 & 2 | |
| Foundation Row | With color A, make the number of fsc needed for the size blanket you are making. See the Notes section above to determine how many you’ll need. |
| Row 1 | Ch 5, turn, sk next 2 fsc, 3 dc in next fsc, *[sk 2 ch, 3 dc in next fsc] twice, sk 5 fsc, [3 dc in next ch, sk 2 ch] twice, (3 dc ch 3, 3 dc) in next fsc, rep from * to * across. |
| Note: You will be working the 3 dc groups into the sps between each two 3 dc groups on the previous row unless the instructions specifically say to work into a different sp. See symbol chart for placement of spike. | |
| Row 2 | Ch 5, turn, 3 dc in first ch 3 sp, *[3 dc in next sp] twice, sk next sp, [3 dc in next sp] twice, [3 dc, ch 3, 3 dc] in next ch 3 sp,* rep from * to * across, ending with (3 dc, ch 3, 3dc) in last ch-2 sp. Fasten off but do not turn. Join color B with sl st in top of last dc. |
 |
|
| Spiked Rows | |
| Row 3 | With B, ch 5, turn, 3 dc in first ch-3 sp, *spst in next 2 sps, sk next sp (at bottom point), spst in next 2 spcs, [3 dc, ch 3, 3 dc] in next ch-3 sp, rep from * across, ending with [3 dc, ch 3, 3dc] in last ch-2 sp. |
| Row 4 | Rep row 3. Fasten off but do not turn. Join next color with sl st in top of last dc. |
| Rows 5+ | Rep rows 3 and 4 with each color in sequence until piece is as long as you need it to be, ending with last color. Weave in all ends before starting border. |
| Border | |
| Round 1 | Join color to be used as the border with a sc in the side of last dc made, make another sc in same dc, 2 sc in the side of ea dc down the entire side of the blanket, sc in next 12 sc, *[sc, ch 2, sc] in next sc (crest of wave), sc in next 8 sc, sk next sc (sc at lowest point between two waves), sc in next 8 sc,* rep from * to * to tip of last wave, [sc, ch 2, sc] in next sc (crest of wave), sc in last 12 sc of last wave, 2 sc in the side of ea dc down the entire second side of the blanket, sc in top of next 2 dc, [dc, ch 2, dc] in first ch-3 sp, *sc in next 8 dc, [dc, ch 2, dc] in next ch-2 sp, sc in next 8 dc, sk next 2 dc,* rep from * to * across top of blanket to last ch-3 sp, [sc, ch 2, 3 sc] in last ch-3 sp (it might be helpful to pm in last sc made), join with sl st in first sc. |
| Round 2 | Ch 1, turn (don’t just continue as turning helps to flatten the points some), sc in first sc (the one you marked and move marker up into st just made) and in next 3 sc, *[sc, ch 2, sc] in ch-2 sp, sc in next 8 sc, sk next 2 sc, sc in next 8 sc,* rep from * to * across top of blanket, sc in ea sc down side to other end, rep from * to * across bottom of blanket, sc in ea sc down second side, join with sl st in marked sc. Fasten off if not continuing to round 3. |
| Round 3 | (Optional) Ch 1, make sure the side you’ve decided is the front is facing you – turn the piece if needed, rsc in ea sc around, join with sl st in first rsc. Fasten off. |
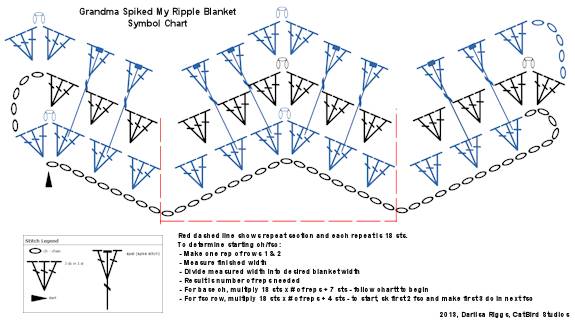 Download PDF version of chart. Print on 11″x17″ paper.Chart made using the Crochet Charts software made by Stitch Works Software. |
|
| Finishing … | |
| Weave in any remaining ends. Wash and block as needed, especially the tips of each wave. | |
| Pattern and photos © Darlisa Riggs, CatBird Studios | |