 |
|
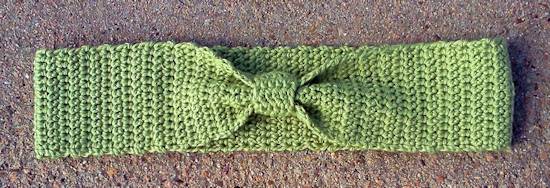
| Even though I don’t wear headbands, I love seeing other people wear them. I wanted to make something that worked up quickly but with a bit of class to it. A bow seemed too much but a headband that looked like a bow seemed to be perfect.As with so many of my patterns, you can use any yarn, just make sure you match the listed measurements.
Also, I don’t knit often but would think you could use a 4.00 mm knitting needle and cast on the same number of stitches called for in the base row, then knit each row or alternate knit and purl rows. |
|
|
Sizes and Materials List …
|
|
| Size: | 0-3 mths [3-6 mths, 6-12 mths, 6-12 mths, 12 mths-3 yrs, 3-10 yrs, teen, adult]Finished sizes (approx):
|
| Hook(s): | US G/6 (4.0 mm) |
| Yarn: | KnitPicks Comfy Fingering [75% Pima Cotton, 25% Acrylic, 218 yds/50 g] |
| Colors & Approx. Yardage |
Peapod, 4 yds for adult size, less for smaller sizes |
| Notions | Yarn Needle |
| Gauge: | Gauge is not important for this project, just make sure you get the length measurements correct although you can make it wider as needed. |
 |
|
|
Notes …
|
|
| Different Stitches | This pattern uses esc but you can replace it with any other stitch, such as sc, dc, hdc, trc, etc., as long as the length is correct.
For a more textured version, alternate stitches using a sc, dc, sc, dc, etc, across, then use a sc only on the bow band for contrast. |
| Different Yarn | If using a stretchier yarn, check how much it stretches before joining the ends together on the headband. It shouldn’t stretch more then the final recommended measurement. |
| Stitches Used | Chain (ch) Slip Stitch (sl st) Extended Single Crochet (sc) Foundation Single Crochet (fsc) |
| Abbreviations | Each (ea) Loop (lp) Stitch(es) (st / sts) Yarn Over (yo) |
| Special Stitches | Extended Single Crochet (esc)
Insert hk in next st, yo, draw lp through (2 lps on hk), yo, draw lp through one lp on hk (2 lps on hk), yo, draw lp both lps on hk. |
 |
|
|
Instructions …
|
|
| Head Band – Crochet | |
| Base Row | Fsc 8 [10, 10, 12, 12, 14, 14]. |
| Row 1 | Ch 1, turn, esc in ea fsc across. |
| Row 2 to end | Rep row 1 until piece is 14″ [17″, 19″, 20″, 20.5″, 22″, 22.5″] long. Remember to take into account how much the yarn stretches. (Please note that for those sizes with a range of measurements, if the person’s measurement is not known, choose a mid-range measurement, i.e., 12″ for a preemie, 13″ for newborn, 15.5″ for baby, etc.) |
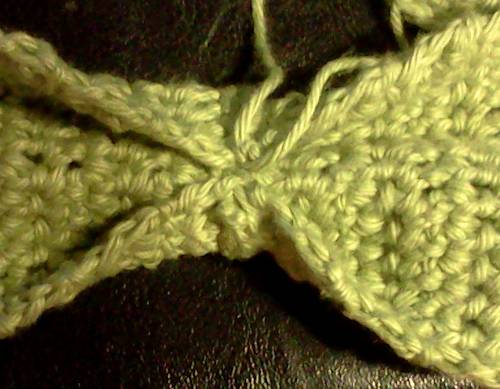
| Join Ends & Gather | |
| Leave a long enough tail to use to stitch the ends together with enough left over to stitch the gathered band together later. Make sure you don’t twist the headband when joining. Do not weave in ends yet. Wash and block if needed. | |
| Make sure the headband is right side out (doesn’t matter which side, just whatever side you decide is the right side), with the joined ends at top center. Pinch the seam at the center of the headband to fold in half then fold the sides up. Use the remaining long tail to sew the ends and center together, then insert the needle through to the back of the band and stitch the two folded sections together. Weave in ends. | |
 |
|
| Bow Wrap | |
| Base Row | Fsc 4 [4, 5, 5, 6, 6, 6]. If you’d like a wider bow wrap, add more fsc for the width you want. |
| Row 1 | Ch 1, turn esc in ea fsc across. |
| Row 2 to end | Rep row 1 until piece is long enough to wrap around the gathered section of the head band. Fasten off leaving a long tail for joining, wash and block if needed. |
| Finishing … | |
| Wrap bow wrap around the gathered section of the headband and join ends in the back using the long tail left previously. When you get to the center of the headband, make at least one stitch through the headband to hold it in place then finish joining the ends. Weave in ends. | |
| Pattern and photos © Darlisa Riggs, CatBird Studios Modeled by Jenny Riggs-Lippincott |
|